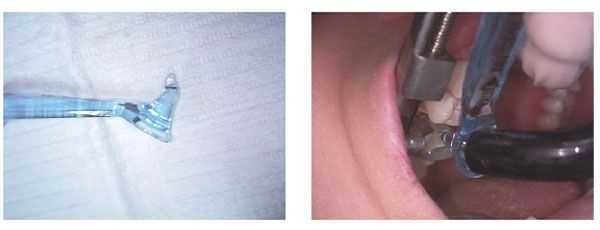
“Best in Show” Greater NY Dental Meeting, November 2008. CEJ Dental Contact Pro is used to create tight interproximal contacts with bonding material. The instrument is held in the proximal box filled with composite while pressing on the matrix band and shining the bonding light through it. How to create a tight closed interproximal contact with dental bonding.
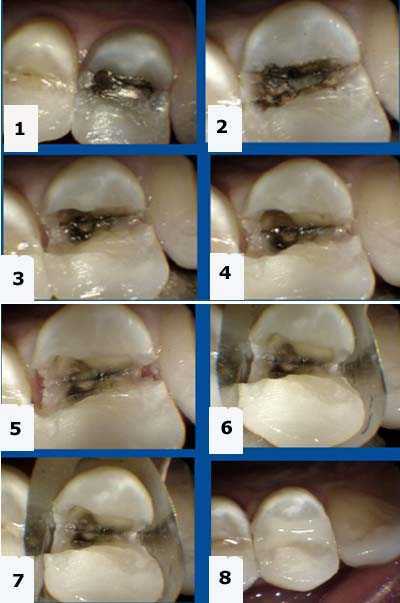
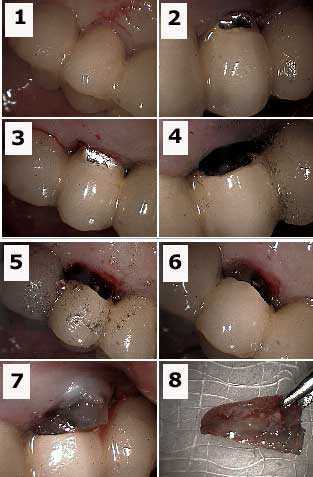
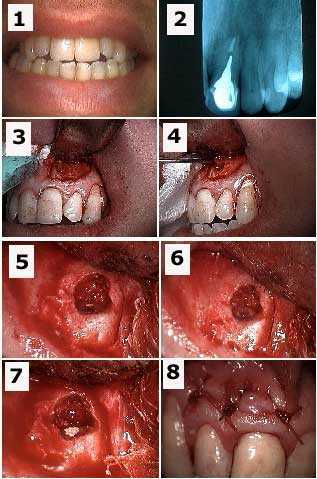
Treatment of a tooth cavity demonstrating one method of how to remove a deep fracture. Note that in the series of photos # 1-8 that the tooth fracture was removed from the outer tooth enamel but remains within dentin. The area around the remaining fracture line within dentin was not soft. The patient was informed about the need to reevaluate this tooth over time for a full coverage dental crown and possible need for root canal therapy.
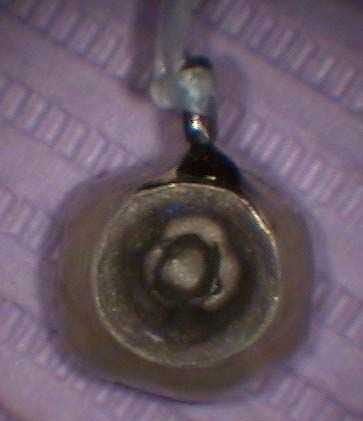
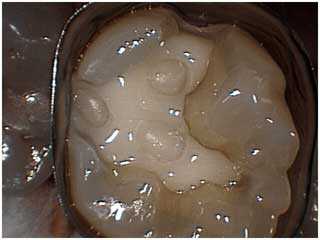
Single PFM tooth crown (viewed from below) to be placed over a dental implant. It demonstrates: 1. how to use a Kaitlyn Loop (instead of a lingual button) with dental floss through it to help prevent it from being swallowed if dropped during try-in. 2. How to create the internal metal coping of a dental crown so that it provides direct access to the dental implant abutment screw hole if needed. Sometimes it becomes necessary in the future to drill through the occlusal porcelain of a dental crown to tighten a loose abutment screw of a dental implant. This simple design makes it easier to find that screw!
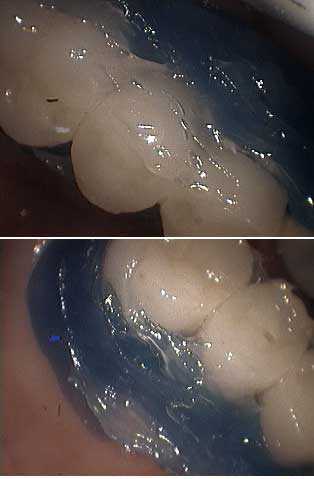
Simple temporary teeth for dental veneers can be made using a clear acrylic stent that is relined with Luxatemp, which doesn’t cure exothermically. The second photo shows half of the temp removed. Luxatemp is a great material to use with porcelain veneers.
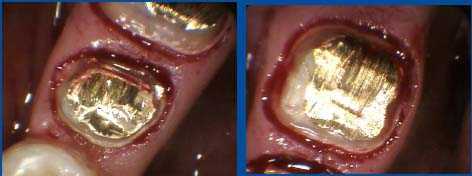
Two cast gold post and cores. The distal margin of the tooth on the left went subgingival, but not so deep that crown lengthening was necessary. I chose to end the crown margin on the gold casting for less than 90 degrees around the tooth – note the margin prepared into the casting in this area to help the dental lab clearly see where the crown margin should be. On the tooth on the right I chose to end the crown margin in the more typical manner, which is on two millimeters of sound tooth structure. Sometimes rules can be broken if logic dictates. How to decide what to do comes from knowledge and experience.
How to perform a root resection from under a large porcelain fused to metal teeth bridge. 1) Labial photo of an abutment tooth with an endo-perio lesion. Pictures 2) & 3) Show initial preparation into porcelain with a diamond bur. 4) Labial photo shows the preparation. The metal portion of the dental bridge is prepared with a steel bur. 5) Palatal view showing preparation. 6) Labial view showing the tooth root under the porcelain (gutta percha is visible in the tooth root). 7) Tooth root being extracted. The occlusal height of this root must first be reduced to allow it to exit. 8) The extracted tooth root.
A helpful tip for how to take a dental impression that includes a fixed teeth bridge. Place blue periphery wax and Vaseline to prevent the impression material from locking into the undercuts in the pontics or embrasures.
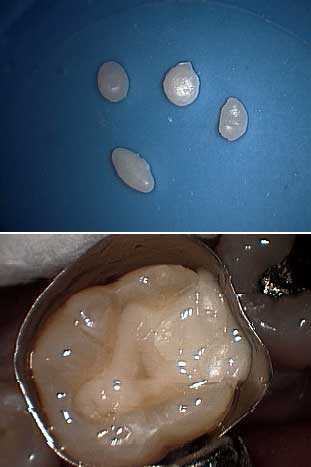
“Bonding balls” technique for condensing composite in a class two restoration. Bonding balls are small, semi-circular pieces of pre-cured composite resin bonding material. They may be used to condense against underlying dental bonding material without the material sticking to a condenser.
Bonding balls placed in a DOL molar tooth preparation. These preformed, light cured balls of composite resin (e.g. Herculite XRV) can be used to condense against the first layer of dental bonding material (e.g. Bisfil 2B) in the proximal box and deeper, pulpal regions.
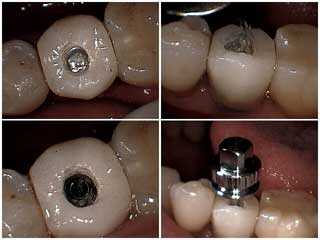
These pictures show how to gain access to a loose second stage screw through a tooth crown cemented on a single dental implant. The crown was loose but the implant itself was solid. You need to differentiate this in advance. Use copious water irrigation with an air-water syringe in addition to handpiece water. 1) Prepare through occlusal porcelain into metal. 2) and 3) Prep through metal to expose the dental cement layer between crown and the dental implant abutment. 4) Access through crown shows second stage screw covered by cotton pellet. Close this access opening with wax (don’t use cotton because it is absorbent) and then composite resin bonding material in the occlusal. You could consider designing crowns for single tooth implants with the access already prepared directly to the second stage screw. This would make getting to the screw much easier should the need arise.
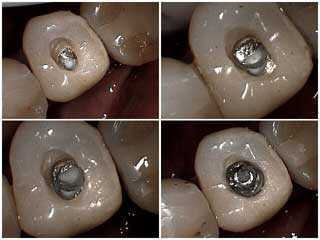
Pictures show how to tighten a loose second stage screw through a tooth crown cemented on a single dental implant. The crown was loose but the implant itself was solid. You need to differentiate this in advance. Use copious water irrigation with an air-water syringe in addition to handpiece water. 1) Drill through the occlusal porcelain into metal. 2) Prepare through the metal to expose the tiny cotton pellet which overlays the slot in the second stage screw. (A cotton pellet is commonly used by many dentists before cementation to prevent the dental cement from filling the screw slot which would prevent being able to ever turn the screw again but this author prefers to use a non-absorbent material like wax instead). 3) Access through crown shows the second stage screw. 4) The dental implant screwdriver in place tightening the screw. You could consider designing crowns for single tooth implants with the access already prepared directly to the second stage screw. This would make getting to the screw much easier should the need arise. It is great to have a variety of different brands and types of dental implant screwdrivers in the office.
How to locate the source of a draining fistula gum boil with the use of gutta percha and an x-ray before performing an apicoectomy – root canal oral surgery. Gutta percha can be gently placed into a draining fistula without anesthesia to locate the origin of the tooth infection.
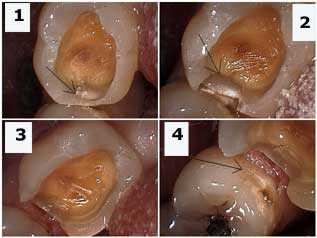
These pictures show how to properly drill or prepare away crack lines that could contribute to recurrent tooth decay when removing dental caries. 1) The arrow points to a crack line extending interproximally – between the teeth. This fracture line can be either white or black. 2) Preparation of a mesial box still shows the presence of the crack surrounded by white decalcification. 3) Appropriate removal of the crack. 4) The arrow points to a crack line adjacent to visible decalcification in the adjacent tooth. Reevaluate your bite wing x-rays radiographs; this tooth should probably also be treated. Note: sometimes it might be necessary to prepare a narrow channel with a 169 carbide steel bur to just remove a crack without unnecessary tooth preparation. This channel could be filled with flowable composite.
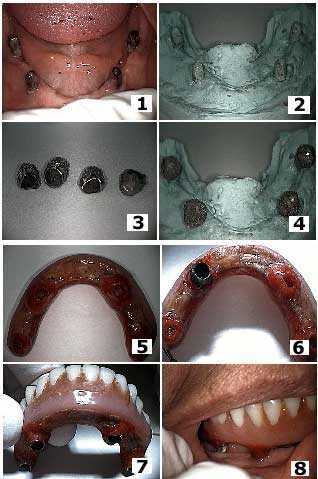
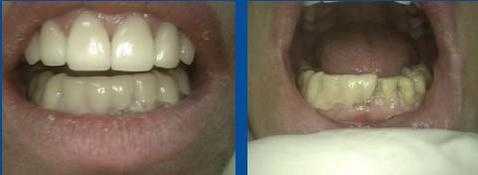
How to retrofit telescopic copings under an all-acrylic prosthesis over a full arch mandibular subperiosteal dental implant. This implant and prosthesis is over 15 years old. The all-acrylic prosthesis had been successfully retained with a small amount of denture adhesive over the dental implant abutments. The patient would return about twice a year to reline the acrylic of the prosthesis that would wear over time against the implant posts. The patient wanted to reduce the frequency of these relines. Photo 1) Full mandibular subperiosteal dental implant. Photo 2) Master model. Photo 3) Four telescopic sleeve copings were fabricated to fit over the dental implant posts and had roughened outer surfaces for incorporation into the acrylic prosthesis. Photo 4) The four copings on the working model. Photo 5) The underside of the all-acrylic implant prosthesis. Photo 6) One coping being incorporated into the prosthesis at a time. The acrylic in the immediate area had been removed to allow the prosthesis to seat over the telescope, then flowable self-curing acrylic was relined over it. Photo 7) The prosthesis with all four copings attached. 8) An intraoral photo of the implant prosthesis with the telescopic copings attached.
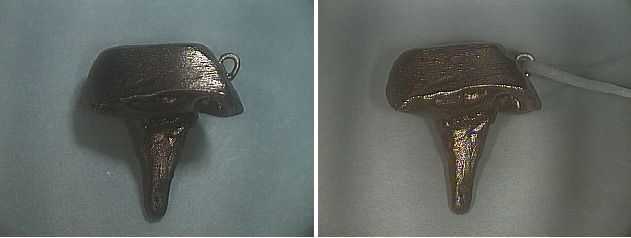
Kaitlyn loop vs. lingual button. How to prevent accidentally swallowing a dental restoration. The Kaitlyn Loop can be cast with both post and cores (as seen here) and teeth crowns. About 12 inches of dental floss is inserted through the Kaitlyn Loop with both ends remaining extra-oral during try-in and dental cementation. This will help prevent accidental swallowing of a cast post and core or crown if it is dropped in the back of the mouth. Hope you don’t need it but be happy you have it if you do.