Photos on dentoalveolar surgery and orthognathic surgery created in our Extraction Oral Surgery office.
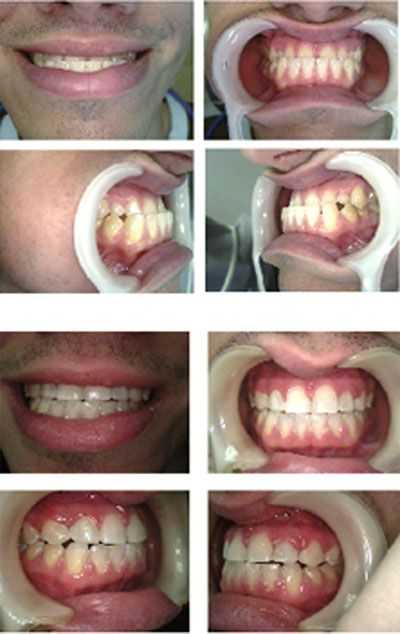
Orthognathic oral surgery and orthodontics were used together to reorient the upper and lower jaws. Before and After photos.

An atypical bone pattern was noted on a 46 year old female during a routine set of dental x-rays. A Panoramic xray also showed something unusual. A subsequent oral surgeon exam revealed no expansion of lingual or buccal cortical bone plates. The teeth have not moved for many years though #30 was extracted many years prior. A moderate depression was noted on the buccal aspect of the jaw of teeth #’s 29 & 30. The patient exhibited mild discomfort in this area upon palpation. A CAT scan confirmed the bone loss and an exploratory dentoalveolar oral surgery was performed. The clinical impression was that of a lateral periodontal cyst. The pathology report showed it to be mildly inflamed fibrous tissue. Note the importance of careful evaluation of bone patterns in regular dental x-rays.
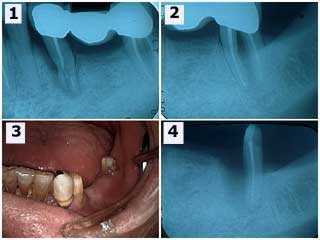
Accidental damage to a teeth bridge. 1) The initial radiograph shows the three-unit bridge and severe damage to the second premolar tooth. 2) The second molar shows a furcation involvement and thickening of the periodontal ligament space around the mesial root. The second premolar and the mesial root of the second molar were extracted. 3) Photo following wound healing. The patient wanted a replacement long span dental bridge instead of dental implants. 4) Radiographic healing of the distal root of the second molar after six weeks. The lesson here is the value of salvaging individual roots of molars.
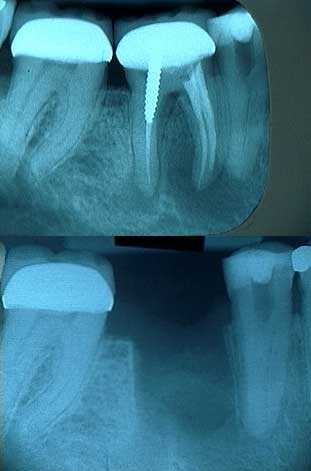
Radiographs of severe periapical pathology around the mesial and distal roots of tooth #30 leading to tooth extraction and removal of a lot of granulation tissue – dentoalveolar oral surgery.
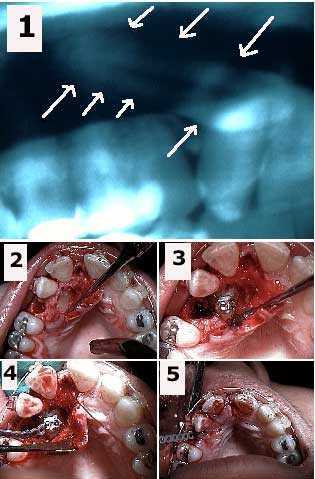
Dentoalveolar oral surgery exposure of a palatally impacted upper canine and placement of an orthodontic bracket and elastic power chain. 1) Panorex showing the horizontal impaction of the upper right canine. 2) Initial exposure of the impacted canine and extraction site after removal of an over-retained deciduous tooth. 3) Orthodontic bracket cemented to the canine tooth. 4) Elastic orthodontic power chain attached to the bracket. 5) Emergence of power chain through the extraction site after suturing. The power chain will be attached to the arch wire to exert a pulling force on the canine to bring it into the area of the present tooth extraction site. The canine will assume a normal position in the arch in 18-24 months.
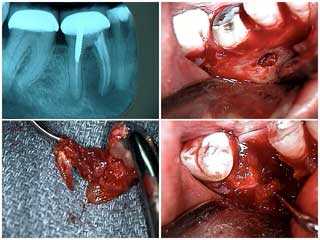
Dentoalveolar oral surgery extraction of tooth #30 due to severe dental infection. 1) Radiograph showing severe periapical pathology around both the mesial and distal tooth roots. 2) Buccal fenestration around the mesial root following a vertical incision and flap. 3) The extracted mesial root with the noted pathology. 4) The tooth extraction site.
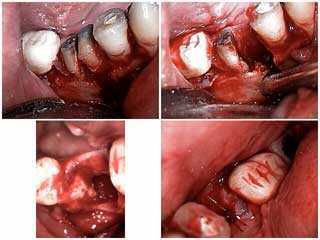
Extraction of tooth #30 due to severe periapical pathology. 1) Sectioning of the mesial and distal roots. 2) Removal of the mesial root. 3) & 4) The extraction site following dentoalveolar oral surgery.
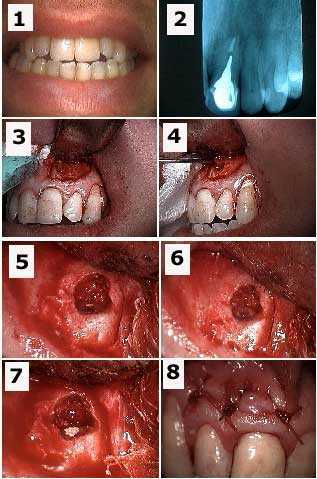
Apicoectomy tooth #9 and retrograde filling to treat a failing root canal. 1) Initial photo. 2) Xray of tooth #9 with a cast post and root canal filled with gutta percha to the tooth root apex. 3) A semi-lunar incision exposed the bony fenestration – opening in the jaw bone. 4) The tooth cyst is pulled through the osteotomy – open in the jaw bone – with a forceps. 5) Osseous preparation – drilling in the jaw bone – exposed the tooth apex with the gutta percha visible. 6) Preparation into the root apex to make room for the retrograde filling. 7) Retrograde filling material – Mineral Trioxide Aggregate – placed into apex preparation. 8) Stitches following dentoalveolar oral surgery.
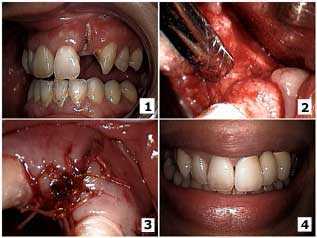
Dentoalveolar oral surgery to close a buccal dehiscence – opening in the gums – on an upper lateral incisor. 1) The initial presentation with the lateral incisor root exposed and dental caries up to the tooth root apex. 2) Oral surgical exposure of the site after extraction of the tooth root. A full thickness mucoperiosteal flap of the gums with bucco-lingual vertical releasing incisions was used to obtain primary closure. The tooth socket was curetted – cleaned out – and freeze-dried cortical chips – bone graft – were placed with Biomend membrane. 3) Primary closure was obtained with 3-0 Vicryl sutures stitches. 4) The final result after fabrication of the porcelain-metal fixed bridge.
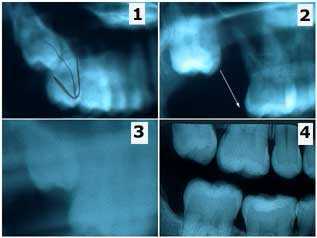
Tooth extraction mistake. This patient is a 27 year-old female who had recently moved to New York from Seattle. She brought prior radiographs and an interesting story involving dentistry in Seattle that I thought was worth relating. 1) In Seattle the patient was referred to an oral surgeon for the extraction of #1 but #2 was mistakenly extracted instead. 2) Radiograph after extraction of #2 showing #1 still present. 3) This new, less clear Panorex was taken a year later (still in Seattle) but the wisdom tooth #1 can be seen moving down into the second molar position on its own. 4) This radiograph was the first of the series taken in our office. The wisdom tooth #1 has almost fully erupted on its own after about two and a half years. PS – the patient was billed for and did pay for the extraction of the wrong tooth. The wonders of dentoalveolar oral surgery.