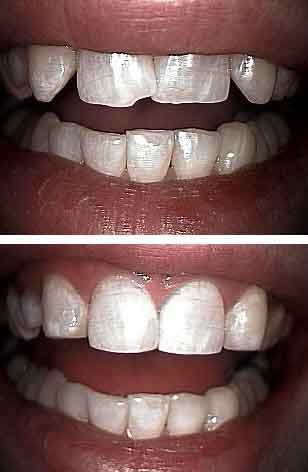
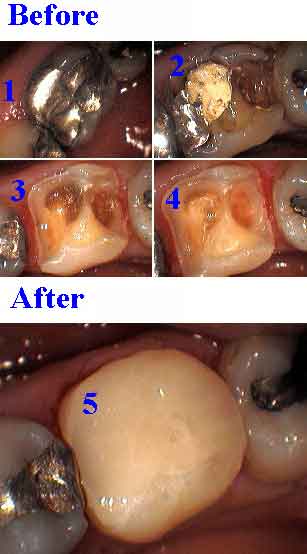
Before and after photos on how to remove a cavity and place a bonded resin filling performed in our Cosmetic Dentistry office.
When drilling out a cavity between teeth, the interproximal tooth preparation should initially leave an other layer of enamel. This will help avoid damaging the interproximal surface of the adjacent tooth.
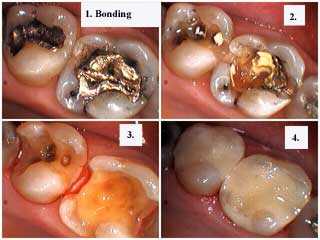
How to remove a broken silver filling (and white sedative medicine left underneath) and replace it with a white tooth bonding. Sometimes root canal therapy may also be needed after removal of deep tooth decay (dental caries).
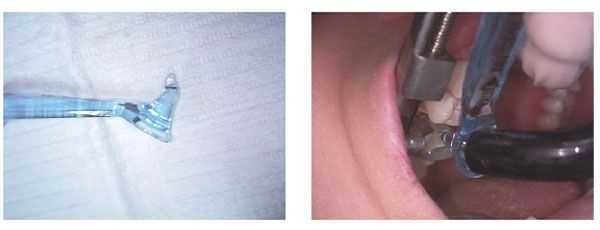
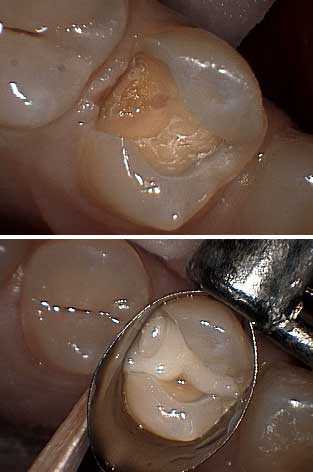
CEJ Dental Contact Pro is shown how to create tight interproximal contacts with teeth bonding material. The instrument is held in the proximal box filled with composite while pressing on the matrix band and shining the dental bonding light through it.
Crown buildup of a lower molar following root canal therapy. 1) Pre-op occlusal view. 2) Buccal view showing severe root notching after the disto-occlusal was filled. 3) The restored occlusal view. 4) The restored buccal view after initial crown preparation. These intra oral pictures show how to perform this procedure.
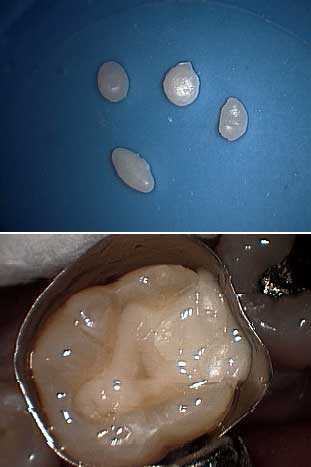
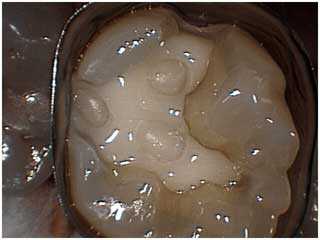
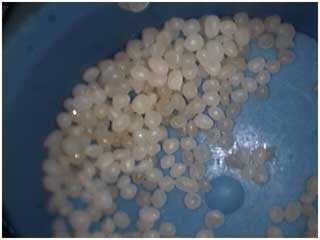
“Bonding balls” technique for condensing composite in a class two restoration. Bonding balls are small, semi-circular pieces of pre-cured composite. They may be used to condense against underlying teeth bonding material without the material sticking to a condenser. The top photo shows how they look before being used.
Bonding to close cosmetic defects. How to create mechanical retention for dental bonding. A 1 mm prep was made into the mesio-lingual to add mechanical retention. Bonding was only added to the lingual surface. This allows labial enamel to naturally reflect light.
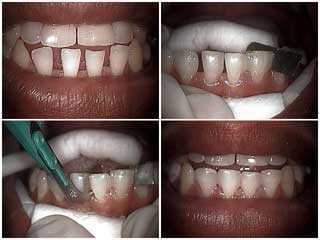
How to close spaces between the lower front teeth using dental composite resin bonding material. Composite resin and dental bonding are used interchangeably in this website.
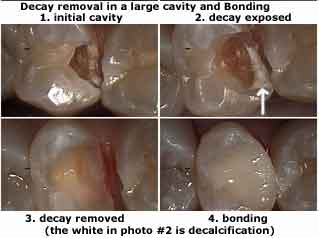
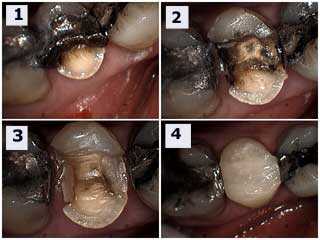
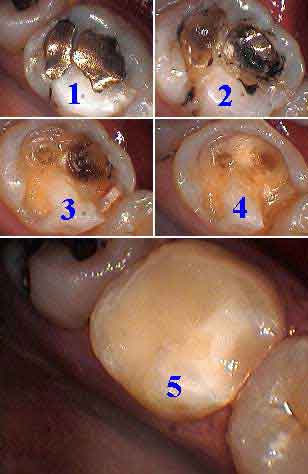
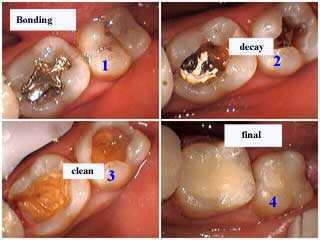
How to remove decay – a large cavity – and placement of teeth bonding material. Photos show how.
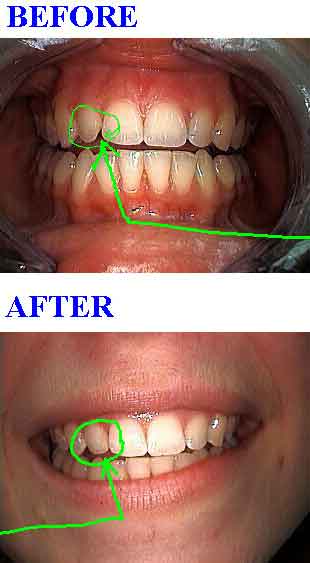
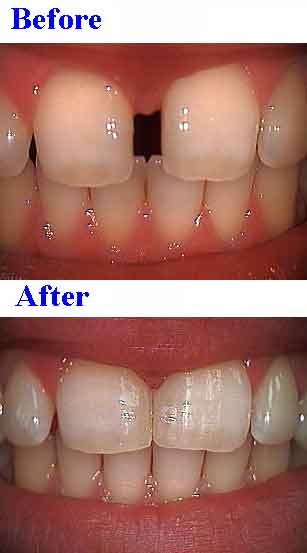
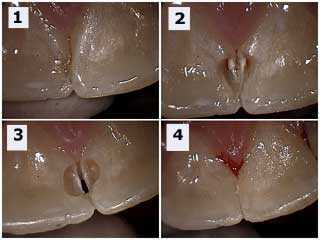
Dental bonding to close a space between the upper two front teeth – a diastema. Pictures show how.
Teeth Bonding – how to. Bonding an upper premolar where the buccal cusp has failed adjacent to a large, old silver filling (amalgam). 2) Silver filling removed. Don’t try to bond to this amalgam since its foundation is not very strong and decay is frequently beneath it. 3) Decay removal. 4) Final composite resin bonding.
How to place teeth bonding balls (preformed, light-cured composite) into the proximal box of a class two restoration. This is used to condense chemical-cured composite into the gingival floor of the box.
How to close a teeth gap with dental bonding. Treatment time: one visit. A 1 mm channel was prepared in the mesial surfaces of both teeth to add mechanical retention. Bonding was only added to the mesial surface and contoured around the gingival papilla.
How to Bond & Sculpt, reshape, teeth.
The patients canine teeth were genetically (congenitally) in the lateral incisor position bilaterally. The canines were shortened and dental composite was added to the mesials to square them. The mesio-incisal of #8 was also bonded after sculpting and stripping interproximally. Total treatment time: 1 hour without the need for shots.
Teeth Bonding technique pictures show how to close spaces, gaps between teeth. Congenitally missing upper laterals.
Tooth Bonding Technique – How to shown in pictures.
After acid etching apply All Bond 2 dentin primer to remove the smear layer. Then apply All Bond 2 dentin enamel bonding agent with dual cured catalyst. Bis-fil 2B self cured composite is next placed in the interproximal boxes and somewhat over the occlusal floor. It can be compressed into the interproximal boxes by condensing on preformed, already cured 2mm wide balls of Herculite XRV bonding material. Herculite XRV dental bonding material is added on top. Light curing should occur for 60 seconds on each the occlusal, buccal and lingual surfaces. A metal matrix with regular wood wedges work fine. Refine anatomy with a #8 round bur and finishing burs. Then use Fortify.
Cosmetic Dentistry (with extraction of a supernumerary tooth and bonding).
Treatment time: one visitThe supernumerary tooth was first prepared to open the interproximal area between the remaining teeth. Bonding was then placed interproximally on both teeth as if the supernumerary was already gone (this gives a clean field).
Then the supernumerary was extracted.
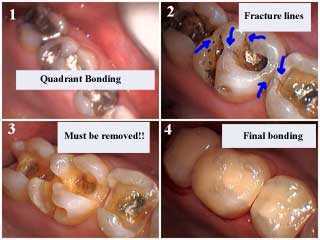
Quadrant teeth bonding – how to – shown in pictures:
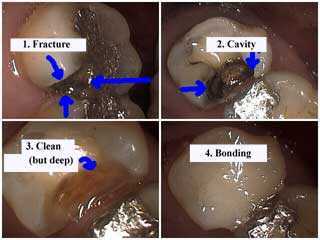
Fracture (cracks) lines must be removed when bonding.
Dental Bonding technique. How to perform an
Indirect pulp cap – near nerve exposure – shown in photos.
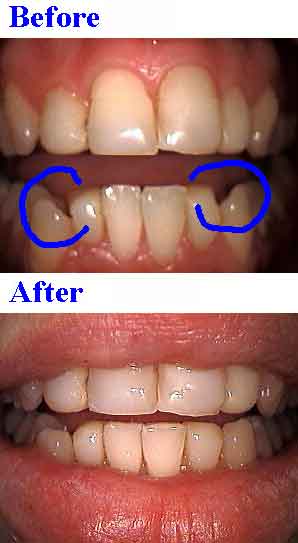
How to close a tooth gap, space, between upper lateral and canine teeth using cosmetic dentistry bonding. Step by step pictures of how to handle composite resin.
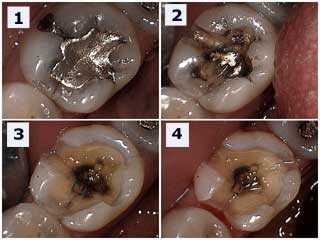
Pictures show how to replace a fractured silver tooth filling with dental composite resin bonding material.
Intra oral pictures show how dental bonding changes silver tooth fillings to white restorations.
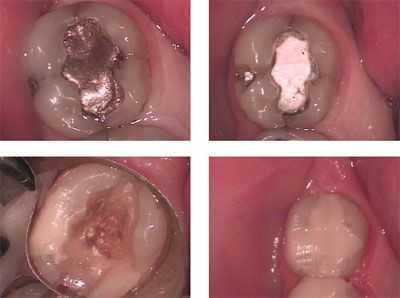
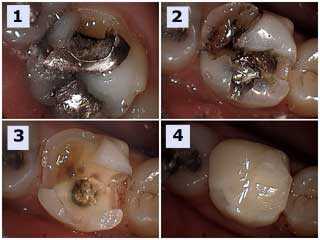
How to Remove of a large silver amalgam filling and place teeth bonding material. 1) Fractured disto-lingual cusp. 2) Amalgam removal. 3) Decay removed. 4) Bonded restoration.
Intra oral pictures show how to replace a decayed silver filling with composite resin.
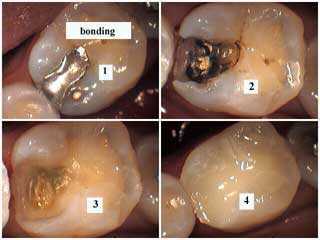
Bonding changes this silver filling to a tooth-colored filling. Photos show how.
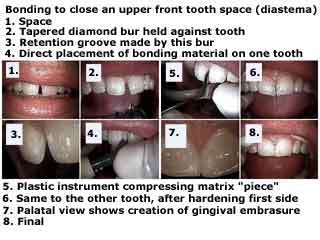
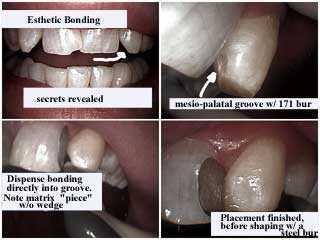
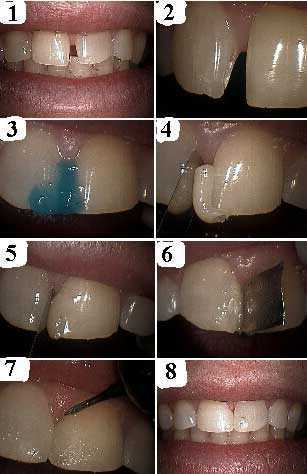
How to place dental bonding material: Intra oral technique pictures: Closing a diastema (space between the upper two front teeth). Steps are numbered in sequence 1-8 below:
1) Diastema
2) Groove prepped into mesial
3) Etch
4) Placement of composite; note matrix “piece.”
5) After shaping with plastic instrument.
6) Other side of matrix piece.
7) Shaping with flame finishing bur.
8) Finish
Dental bonding balls placed in a DOL molar prep. These preformed, light cured balls of composite (e.g. Herculite XRV) can be used to condense against the first layer of teeth bonding material (e.g. Bisfil 2B) in the proximal box and deeper, pulpal regions.
How to remove decay – cavity – under a large amalgam silver filling reveals a fracture line. 1) Large amalgam showing a mesial interproximal crack line. 2) Amalgam removal still shows the presence of the crack line. 3) This mesial crack line is now seen to be continuous through the middle of the tooth and out towards the buccal. 4) The crack line has been removed as much as possible without invading the pulp chamber. Root canal therapy and a crown would be the most predictable method to keep the mesio-buccal cusp from further fracture. A bonded restoration would be a second choice but would help to prevent further cracking particularly if the mesio-buccal cusp was reduced occlusally and bonding overlayed. A non-bonded amalgam would probably exacerbate the fracture over time.
Large teeth bonded restorations replacing decayed silver fillings. Step by step photos.
How to replace a decayed silver filling with tooth bonding. Intra oral pictures.
Eliminating Fangs – fang teeth – with dental composite. Treatment time: one visit. Prepare a 1 mm deep “box” on the mesio-lingual of each canine to add mechanical retention. Only add bonding to the lingual surface.
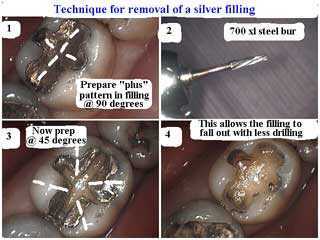
How to technique for the gentle removal of a silver filling. Intra oral pictures.
How to make dental bonding balls, preformed composite resin material which are molded with fingertips and light cured for 5-10 seconds. They are made in various sizes by office staff. Bonding balls are used to condense bonding material particularly in the interproximal boxes of class two restorations.
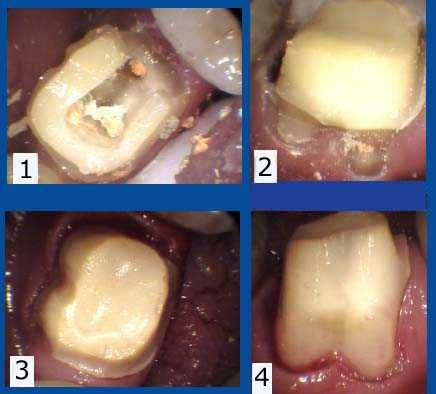
How to removal a tooth cavity and bond from the palatal side of the upper two central incisor teeth. 1) Pre-op palatal view of #’s 8 & 9. 2) Interproximal decay. 3) Decay removed. 4) Final bonding.
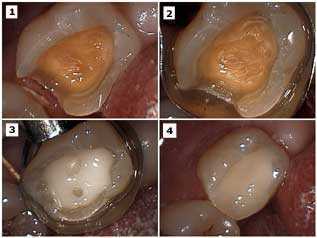
Final tooth preparation before placement of direct-bonding material in a lower molar. 1) – 2) Final tooth preparation. 3) Placement of chemically-cured flowable bonding material. Note the presence of several spheres of slightly different-colored bonding material within the flowable bonding material. These are spheres of light-cured bonding material (“bonding balls”) that are used to condense against. 4) The final bonded restoration. How to photos.
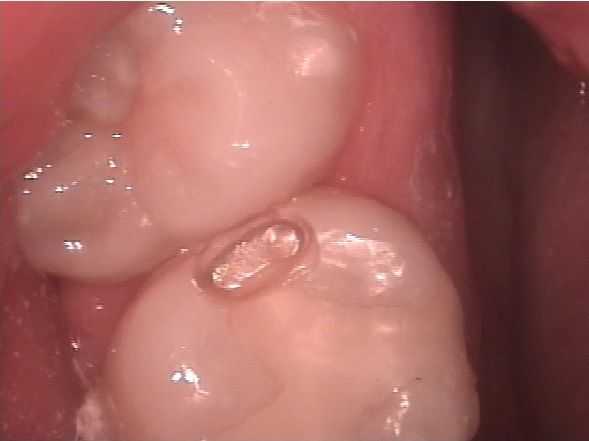
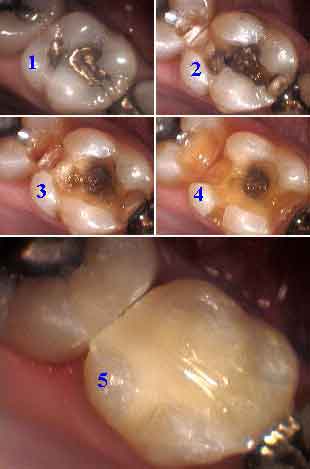
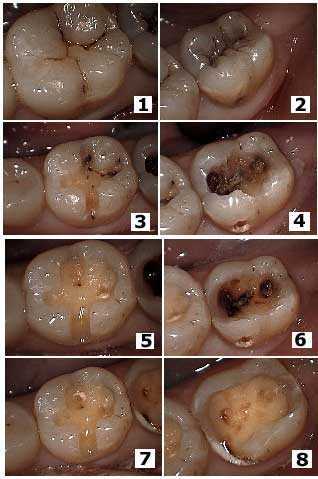
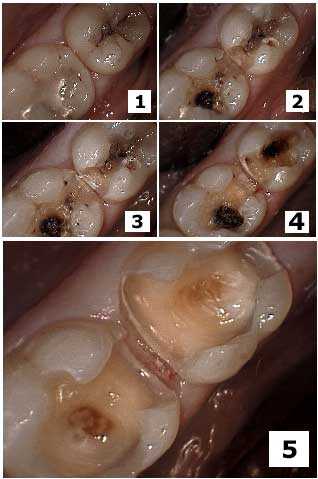
How to diagnose cavities: Cavity identification, cavity removal and bonded fillings in two upper molars. Photo Image #’s 1, 3, 5 and 8 show the first molar; Image #’s 2, 4, 6, 7 and 8 show the second molar. Image #’s 1 and 3 show the initial cavity. Image #’s 3 – 7 show the steps in cavity removal. Image # 8 shows the final bonded fillings.
How to diagnose cavities: Cavity identification and removal in two molars. Photo Image #’s 1, 3, 5 and 7 show the first molar; Image #’s 2, 4, 6 and 8 show the second molar. Image #’s 1 and 2 show the initial cavities. Image #’s 3 – 8 show progression in the still incomplete cavity removal in both teeth. For the second molar note how the decalcification and decay spread laterally from the buccal surface all the way into the mesial box in image #’s 2, 4, 6 and 8.
Intra oral pictures how to diagnoses dental caries: Cavity identification and removal in two lower molars. 1) The interproximal decay was identified in x-rays; the teeth looked ok intraorally. 2) – 3) Initial cavity preparation into the proximal boxes. Notice that in the proximal boxes, the mesial of the second molar shows a zone of decalcification (increased whiteness) and the distal of the first molar shows a black crack line. Both should be removed. 4) Note that cavity removal shows the continued presence of decalcification and decay on the lateral (buccal) edges of both proximal boxes. 5) Complete cavity removal.