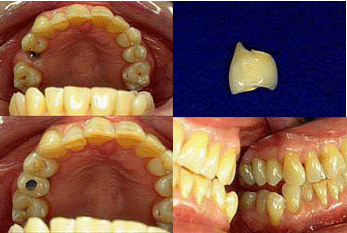
Before and after photos on single tooth dental implant and osseointegration performed in our dental implants office.
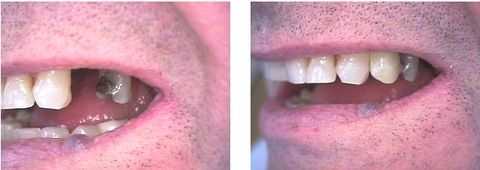
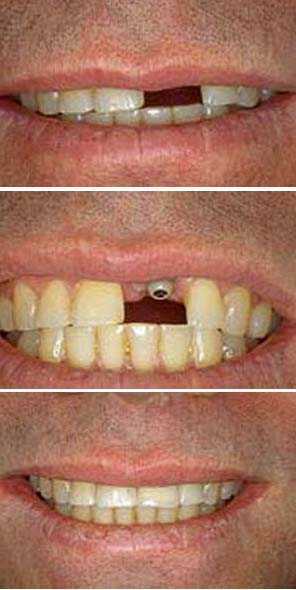
I had lunch with a group of friends last month and I noticed a friend was missing a tooth! I asked him why and he said he was getting a bone graft and then a dental implant so his dentist and oral surgeon thought to leave him like that for the nearly twelve months the bone graft and then dental implant would take to heal. I told him to visit my office and I would give him a custom-shaded “fixed” temporary crown that is not removable. Total treatment time was less than one hour. Note this is NOT a flipper which is a “removable” temporary tooth. Avoid lazy dentists.
A porcelain crown is cemented onto a dental implant. The dental lab ceramist added stain and imperfection to create a real-looking porcelain crown. Contrast this aesthetic result with the two posterior dental crowns that are not aesthetic.
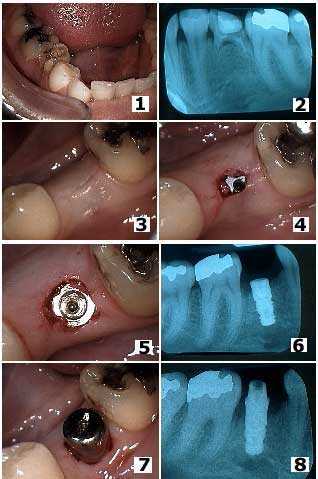
These oral surgery pictures show the placement of a first stage dental implant in the upper right jaw. 1) Top left photo shows the initial vertical releasing incision and the exposure of maxillary alveolar bone. 2) Top right photo shows the initial pilot hole drilled into the bone. 3) The middle left photo shows the progression of drilling into the jawbone. 4) The middle right photo shows the first stage dental implant in place. 5) The bottom left photo shows the implant healing collar in place. 6) The bottom right photo shows after placement of sutures – stitches.
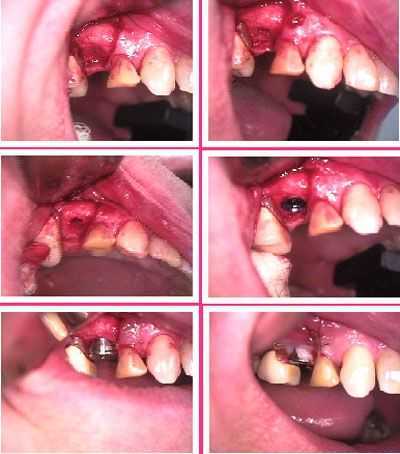
Treatment sequencing single tooth dental implant – all this work was completed in one visit. An old upper left bridge #12 – 14 (first row of photos) had failed. The crown around #12 was sectioned (second row of photos) to facilitate access for the Endodontist. The Oral Surgeon then removed the remaining bridge #13 – 14 and placed a dental implant in the #13 space (third row of photos). A fixed temporary bridge was then placed from #12 -15 during osseointegration healing. Treatment sequence logic: 1. Facilitate Endodontist access, 2. No need to section and remove the bridge from tooth #14 since it would come out with the extraction, 3. Non-bleeding procedures should be performed before those that result in bleeding, 4. Implant placement after extraction.
Single PFM dental crown tooth (viewed from below) to be placed over a dental implant. This photo shows: 1. A Kaitlyn Loop – instead of a lingual button – with dental floss through it to help prevent it from being swallowed if dropped during try-in. 2. The internal metal coping is created to direct access to the abutment screwhole if it becomes necessary in the future to drill through the occlusal porcelain of the dental crown to tighten a loose abutment screw. Always tighten second stage abutment screws to the manufacturer’s specification using a torque driver.
How to pictures.
1. The upper right second premolar tooth is missing. Notice that a single tooth dental implant has been inserted into the area where the tooth is missing.
2. Profile of the dental crown tooth that is secured to the implant by means of a connecting screw.
3. The porcelain dental crown tooth is permanently fastened to the dental implant. The access hole that affords passage of the connecting screw is filled with tooth colored material after replacement tooth is anchored.
4. Side photo of the replacement tooth anchored in place.Copyright Dr. Neal Gittleman, Houston.1dentist.com
Before and after pictures of a single tooth dental implant and porcelain dental crown tooth.
1. Upper left central incisor tooth is missing. Would you want to have your dentist cut down two perfectly good teeth adjacent to the space to accommodate a 3 unit fixed bridge?
2. The dental Implant is “peeking” through the gum tissue. The implant will eventually anchor a new tooth crown to replace this patient’s missing tooth.
3. Implant-supported porcelain dental crown is secured in place.Copyright Dr. Neal Gittleman, Houston.1dentist.com
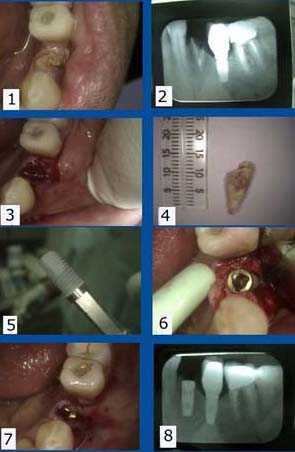
Single tooth implant oral surgery placement after extracting a broken tooth – a lower left first premolar that does not have infection in the surrounding gums. Note in the x-ray that the lower left second premolar position already has a dental implant as well. 1) – 2). Pre-op showing the chipped tooth, clinically and radiographically. 3) The tooth socket is surgically exposed and ready for dental implantation. 4) The extracted tooth. 5) A titanium threaded dental implant ready for insertion by the Oral Surgeon.
6) The tooth implant was inserted into mandible – the lower jaw – using a slow speed handpiece.
7) Implant is covered and surrounding gum tissue sutured using 3-0 chromic gut dissolvable sutures. 8) Post-op xray.
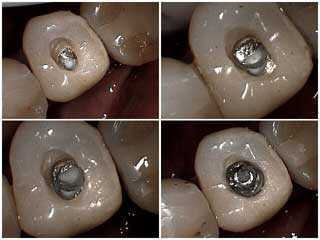
How to tighten a loose second stage screw through a dental crown cemented on a single tooth dental implant. The tooth crown was loose but the implant itself was solid. You need to differentiate this in advance. Use copious water irrigation with an air-water syringe in addition to handpiece water. 1) Prepare through the occlusal porcelain into metal of the tooth crown. 2) Then prep through the metal substructure of the crown to expose the tiny cotton pellet which usually overlays the slot in the dental implant second stage screw. 3) Access through the dental crown shows the second stage screw. 4) The dental Implant screwdriver is in place tightening the abutment screw. Close this access opening with blue wax – not a cotton pellet – and then composite resin in the occlusal. A cotton pellet will absorb saliva over time; wax won’t. You must put something over the screw otherwise dental bonding material will fill the screw slot and you will never be able to regain access to the screw.
You could consider designing crowns for single tooth implants with the access already prepared directly to the second stage screw. This would make getting to the screw much easier should the need arise. Always torque these screws to specification.
How to gain access to a loose single tooth dental implant second stage screw through a dental crown cemented on a single implant. The tooth crown was loose but the implant itself was solid. You need to differentiate this in advance. Use copious water irrigation with an air water syringe in addition to the handpiece water. 1) Drill through occlusal porcelain of the dental crown into the metal substructure. 2) and 3) Prepare through metal to expose the thin cement layer between the tooth crown and dental implant abutment. 4) Access through the crown shows the second stage screw covered by cotton pellet. Close this access opening with a blue wax as discussed in the pictures above.
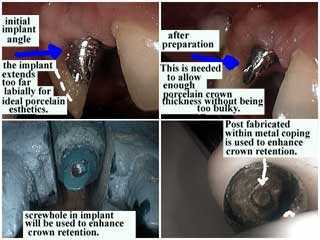
This single tooth dental implant second stage abutment extends too far labially for ideal porcelain dental crown aesthetics. This abutment is drilled with lots of water to create enough room for the ideal porcelain thickness of the tooth crown. The screwhole in implant is used to enhance crown retention.
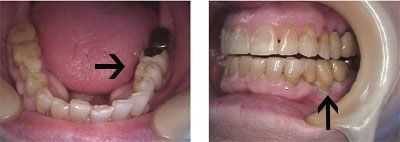
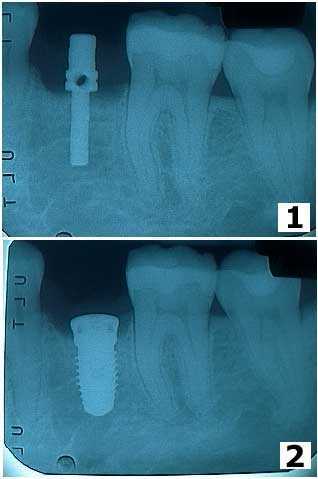
Two single tooth dental implants are ready for porcelain teeth crowns. Dental Implants may be thought of as artificial tooth roots on which porcelain dental crowns are cemented.
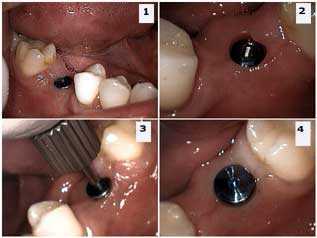
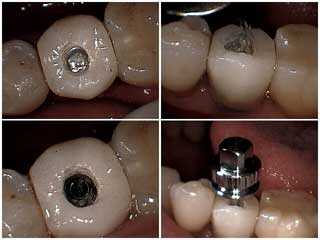
Cover screw removal on a single tooth dental implant and placement of a dental implant healing abutment. How to pictures. 1) Tooth implant in the lower first molar position with the cover screw in place. 2) The cover screw is removed and shows the female threading inside the first stage dental implant. 3) The healing abutment being screwed in place. 4) The dental implant healing abutment in place.
Surgical isolation of a first stage single tooth dental implant and placement of a dental implant healing collar. 1) Initial incision by the Oral Surgeon. 2) Identification of the dental implant cover screw. 3) Cover screw removal reveals the internal female threading of the first stage implant. 4) Placement of the healing collar. How to pictures.
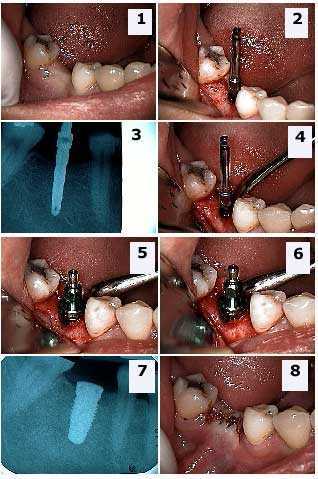
Oral surgery for the first stage of a single tooth dental implant in the mandible. How to pictures. The abutment teeth have minimal restorations. 1) The pre operative photo. The clinical exam revealed sufficient width and depth of bone for the placement of the dental implant. 2) An osteotomy was made by the Oral Surgeon with a surgical bur with internal irrigation. 3) Xray taken to assure enough room between the apex of the dental implant and the inferior alveolar nerve. 4) The surgical bur in position. 5) – 6) The dental Implant placed with the implant carrier still attached. 7) Radiograph of implant confirming correct placement. 8) Primary closure of surgical site awaiting osseointegration.
Oral surgery extraction of a retained primary molar baby tooth and placement of a single tooth dental implant. 1) Intraoral photo of the retained primary molar in the second premolar position. 2) X-ray radiograph of this tooth. Note that these retained baby teeth can remain in the mouth many years. This tooth was finally getting loose in this 37 year-old female. 3) Primary closure after removal of the tooth and placement of the dental implant. The tooth implant was placed at the same time as the extraction because the extracted tooth was not infected and its removal did not leave a void in bone. 4) Photo of the first stage dental implant four months later. 5) Occlusal photo after removal of the healing screw at four months. 6) Xray at four months. 7) Dental implant healing collar in place. 8) Radiograph of the implant with healing collar in place.
Osseointegrated dental implant oral surgery for a single tooth. How to x-rays. 1) Marking pin placed to check angulation and depth of the dental implant to be placed. 2) Tooth implant in position.
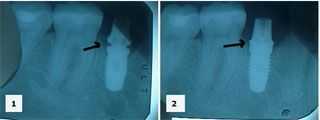
These xrays show second stage dental implant abutments being connected. 1) This x-ray shows that the second stage abutment is not completely seated against the first stage dental implant. 2) This xray shows correct seating of the second stage abutment on the dental implant.
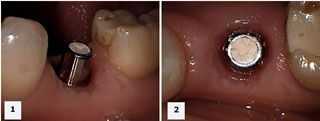
Two pictures of a second stage dental implant abutment ready for a dental crown impression. 1) Buccal photo. 2) Occlusal photo. Temporary dental filling material is in the occlusal opening of the abutment with a small piece of blue wax below it over the internal screw.