Before and after photos on X-rays of dental implants and panoramic radiographs performed in our dental implants office.
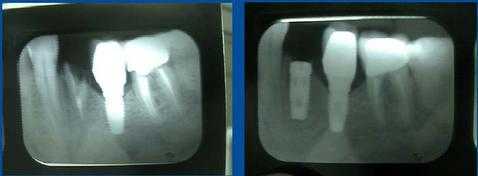
Radiographs x-rays of dental implants. Before and after xray shows placement of a dental implant in the first premolar position in the mandible adjacent to a dental implant in the second premolar position. This new dental implant followed treatment for a broken tooth. The second x-ray shows the new first stage dental implant with a cover screw after placement by the Oral Surgeon.
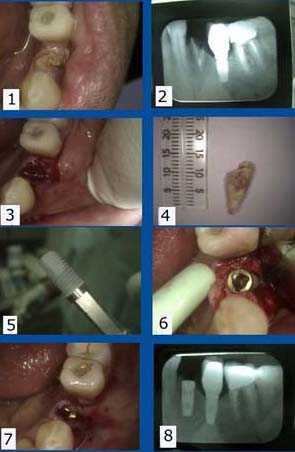
Single tooth implant placement after extracting a broken tooth that was not infected. The lower left second premolar position already had a dental implant. Pictures and x-rays. 1) – 2). Pre-op photo and x-ray show the broken tooth. 3) The tooth extraction socket is exposed by the Oral Surgeon and ready for dental implantation. 4) Photo of the extracted tooth. 5) A titanium threaded dental implant is ready for oral surgery insertion.
6) The tooth implant was inserted into mandible using a slow speed handpiece dental drill.
7) Implant covered and surrounding tissue sutured using 3-0 chromic gut dissolvable sutures stitches. 8) Post-op xray.
6) The tooth implant was inserted into mandible using a slow speed handpiece dental drill.
7) Implant covered and surrounding tissue sutured using 3-0 chromic gut dissolvable sutures stitches. 8) Post-op xray.
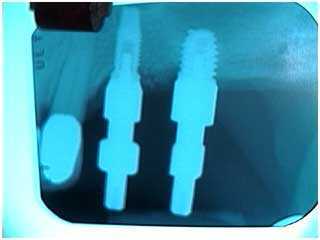
Radiograph x-ray of the impression copings connection before taking a dental impression of dental implants in the upper jaw. An xray should always be taken at this time to confirm an accurate fit of the impression copings.
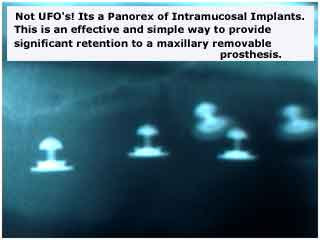
Intramucosal dental implants are shown in this panoramic radiograph x-ray of the maxilla. Snapinserts are another name for intramucosal implants or intramucosal inserts. They work but the technique is only known by very experienced implant dentists so they are not commonly offered to osteoporosis and osteopenia patients in need of dental implants in the upper jaw. They look like flying saucers – UFOs! – in a dental xray.
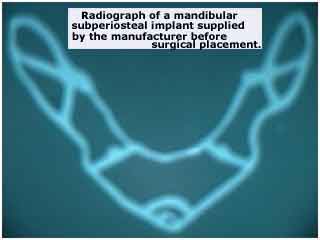
Radiographic analysis. X-ray of a mandibular subperiosteal dental implant. This occlusal radiograph xray will typically come from a premium subperiosteal implant dental laboratory.
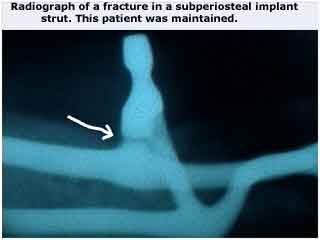
Radiograph xray of a fracture in a subperiosteal dental implant strut. Fractures can occur in all types of dental implants. They frequently can only be diagnosed by dental x-ray. This patient was successfully maintained without treatment for many years.
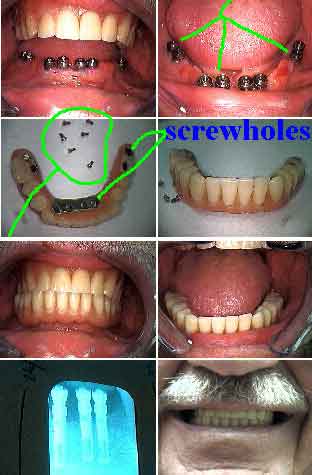
Photos and a periapical x-ray of eight dental implants in the lower jaw – mandible. In the top four pictures, the dental implants and prosthesis are shown. The screws attach the dental prosthesis to the implants. The final four pictures show the final xray of the implants along with the final result.
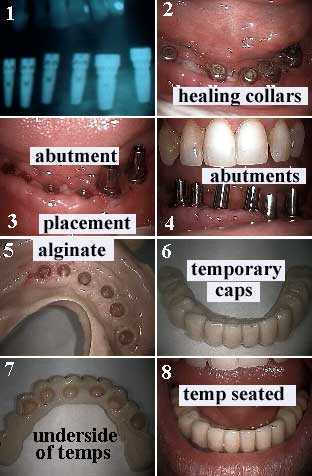
Six dental implants in an edentulous mandible. This x-ray shows the first stage dental implants after placement of the cover screws.
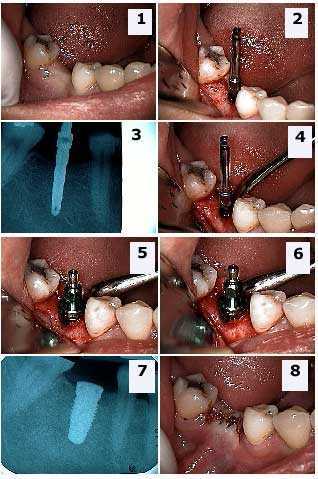
Dental implant oral surgery for the first stage implant in the lower first molar position. The abutment teeth have minimal restorations. 1) The pre-operative site. The clinical exam revealed sufficient width and depth of bone for the placement of the dental implant. 2) An osteotomy was made with a Sterioss bur with internal irrigation. 3) A radiograph x-ray was taken to confirm there was enough room between the apex of the implant and the inferior alveolar nerve. 4) Sterioss bur in position. 5) – 6) The dental Implant is placed by the Oral Surgeon with the implant carrier still attached. 7) Xray of the dental implant confirming correct surgical placement. 8) Primary closure of surgical site with stitches.
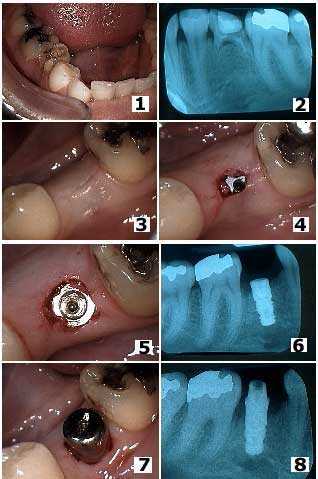
Extraction of a retained primary molar – a baby tooth – and placement of a tooth implant. 1) Intra oral photo of the baby tooth molar in the second premolar position. 2) Radiograph x-ray of this tooth. Note that these retained primary teeth can remain in the mouth many years. This tooth was finally getting loose in this 37 year-old female. 3) Primary closure after removal of the tooth and dental implant placement. The implant was placed at the same time as the tooth extraction because the extracted tooth was not infected and its removal did not leave a void in bone. 4) Initial location of the first stage implant four months later. 5) Occlusal view after removal of the healing screw at four months. 6) Xray at four months. 7) The dental implant healing collar in place. 8) Radiograph xray of the dental implant with the healing collar in place.
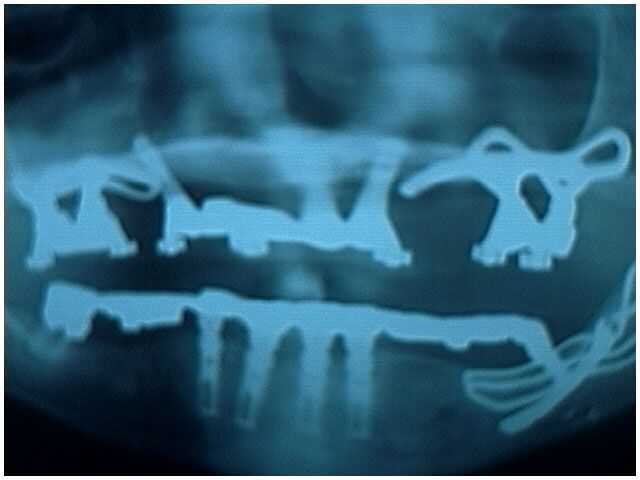
Panoramic x-ray radiograph shows a combination of dental implants used in the Dental Reconstruction Oral Rehabilitation of one patient. Three unilateral subperiosteal implants (two upper and one lower) that vary in age from 5-16 years, seven anterior dental implants (three upper and four lower) that vary in age from 3-11 years, and one lower posterior molar with a telescopic coping that has remained intact for 16 years. This patient maintained her dental implants for over 20 years until her death at age 88. Dental implants smile makeover xray.
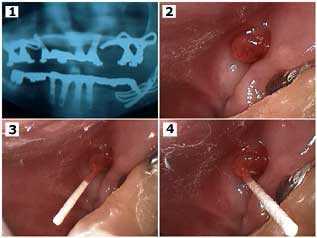
A panoramic radiograph xray and pictures show an infection around a dental implant and treatment. An Oral Microbiology Culture was taken from a draining fistula around a maxillary unilateral subperiosteal dental implant. Cultures should be taken before prescribing antibiotics. The diagnosis from Dr. Max Listgarten’s lab was an unusual Enterococcus Faecalis infection. This infection was resistant to Penicillin, Tetracycline and Metronidazole. It was successfully treated with appropriate antibiotics and never returned.
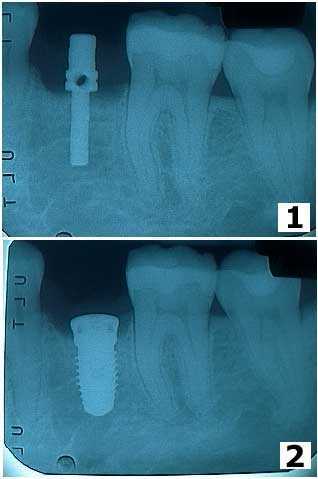
Radiographic series. How to dental implant oral surgery x-rays. 1) The first radiograph xray shows the marking pin placed to check angulation and depth of the dental implant to be placed. 2) The second periapical x-ray shows the dental implant in position.
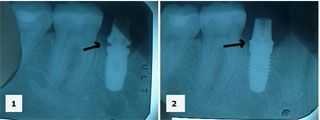
Two x-rays show the second stage dental implant abutment being connected. 1) The first radiograph xray shows that the second stage dental implant abutment is not completely seated against the first stage tooth implant. 2) This x-ray shows correct seating of the second stage abutment. Radiographs are needed to confirm the fit of dental implant components.