Before and after photos on crown buildup after root canal with composite resin performed in our General Dentistry office.
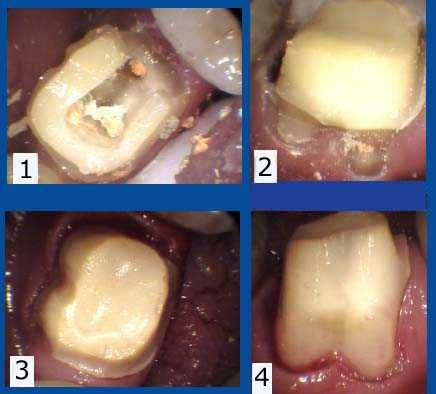
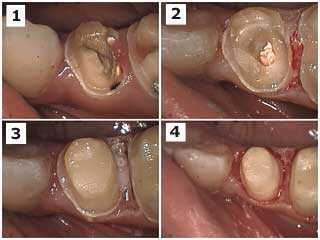
Tooth crown buildup of a lower molar following root canal therapy. 1) Pre-op occlusal image. 2) Buccal image showing severe root notching after the disto-occlusal was filled. 3) The restored occlusal image. 4) The restored buccal image after initial crown preparation.
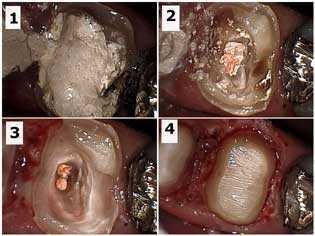
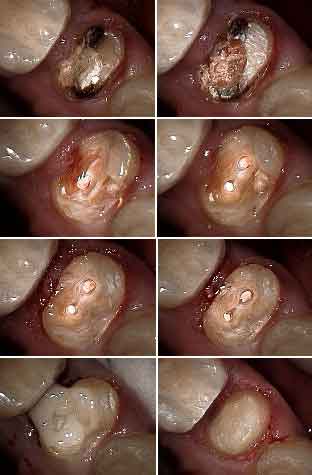
Dental crown buildup of a badly broken down upper right first molar tooth after root canal therapy. 1) Temporary filling material, in the tooth following root canal therapy. 2) Gutta percha exposed in the pulp chamber after removal of the Cavit. Decay is still present. 3) Decay removal and preparation into the canal orifices to aid in mechanical retention of the bonded core. 4) Final preparation after electrosurgery in the distal section of the tooth.
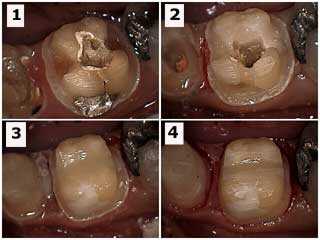
Dental crown buildup and crown preparation following root canal therapy. 1) Cavit temporary material visible after removal of temporary crown. 2) Preparation into pulp orifice to remove coronal gutta percha. 3) Crown build-up after initial shoulder preparation. 4) Final tooth preparation.
Patient presented in pain in her lower right side. Root canal therapy, dental crown buildup and crown preparation was performed for both the molar and premolar. The molar is the focus in this series of photos.
Dental crown build-up and crown preparation following root canal therapy. 1) Cavit temporary material visible after removal of temporary crown. 2) Preparation into pulp orifice to remove coronal gutta percha. 3) Crown build-up after initial shoulder preparation. 4) Final tooth preparation.
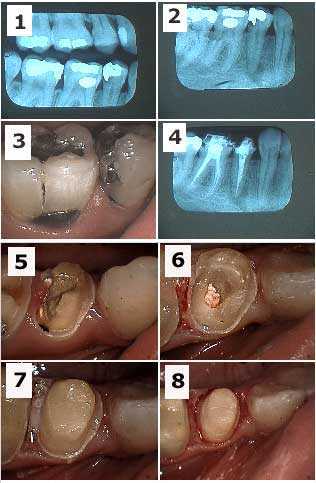
Patient presented in pain on her lower right side. Root canal therapy, dental crown build-up and crown preparation was performed for both the molar and premolar. The premolar is the focus in this series of photos
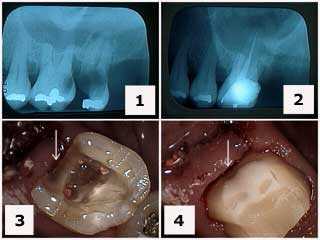
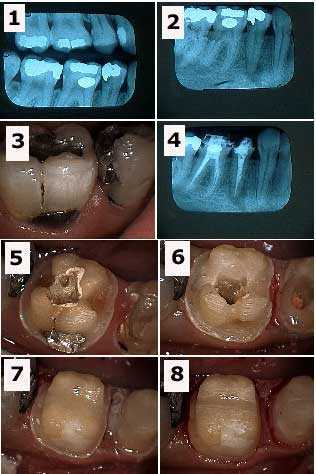
Tooth decay treatment pictures and x-rays. 1) Initial x-ray. 2) X-ray following extraction of tooth #15 and root canal therapy on tooth #14. Note the gingival extent of the decay. 3) Tooth preparation following root canal therapy and the removal of the distal decay. 4) Final tooth preparation of the composite crown build-up. Note how the distal tooth preparation extends gingivally beyond the composite to tooth.
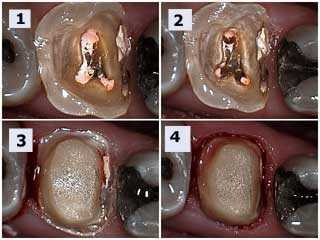
Dental crown buildup following root canal therapy in a molar. 1) Following root canal therapy. 2) Tooth preparation for crown buildup. Note preparation into root canal orifices creates mechanical retention of the core. 3) Initial shoulder preparation. 4) Bevel placement. This tooth needs crown lengthening periodontal surgery.
Dental crown build-up in an upper premolar following root canal therapy and crown lengthening periodontal surgery. There was adequate remaining tooth structure so a cast post and core was not necessary. Consider preparation into the root canals to add mechanical retention for the bonded composite.
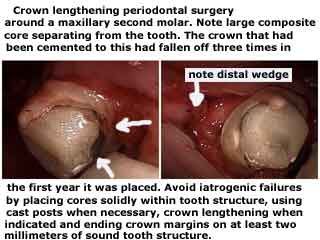
Gum surgery around a maxillary second molar is performed to gain more healthy tooth structure for a dental crown to grab. A large, failing dental composite core is also shown separating from the tooth. Note: last sentence reads “…crown lengthening when indicated and ending crown margins on at least two millimeters of sound tooth structure.”
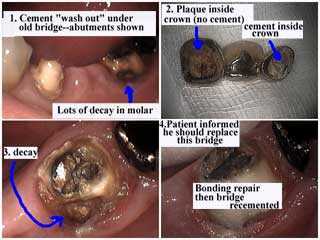
Dental Cement leakage under an old teeth bridge.
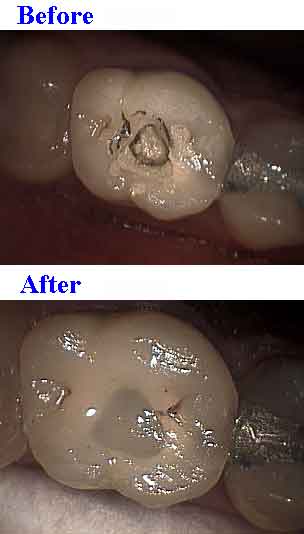
Dental bonding to seal root canal access through a tooth crown. Porcelain etch and silane prime the width of porcelain exposed through the access in addition to all other bonding steps. This will minimize subsequent microleakage.
Drilling a tooth for porcelain crown and a dental crown buildup:
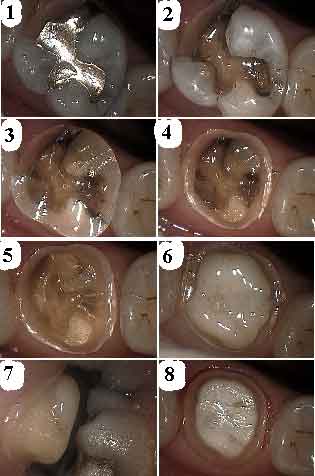
1) Disto-palatal fracture of #3
2) Amalgam removal and evaluation (patient had previously been informed about the probability of needing a crown for this tooth).
3) Occlusal reduction for crown.
4) Circumferential reduction for crown.
5) Stain and decay removal.
6) Bonding for crown buildup (unprepared).
7) Checking occlusal clearance.
8) Final preparation including placement of bevel.
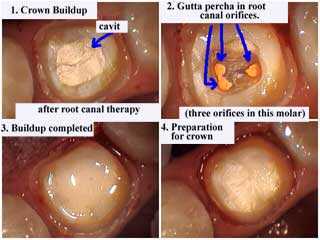
Dental crown buildup after root canal therapy. Then preparation for a tooth crown.
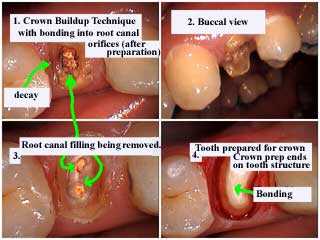
Dental crown buildup method with dental bonding into root canal orifices after drilling. Notice the tooth crown preparation ends on solid tooth structure.
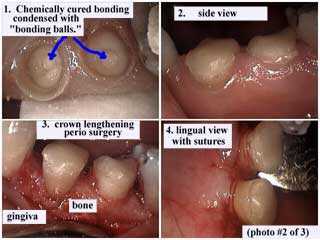
Dental Crown Buildup with pictures of Bonding Balls: Dental bonding condensed with Bonding Balls. Teeth require crown lengthening for more tooth — crown margins should not end on a core! Note: word in bottom left corner reads “gingiva.”
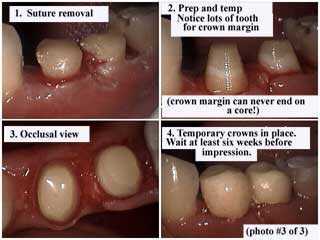
These pictures show a lot of solid tooth structure has been obtained after gum surgery so that the final crown margins will correctly end on tooth not the dental crown buildup.
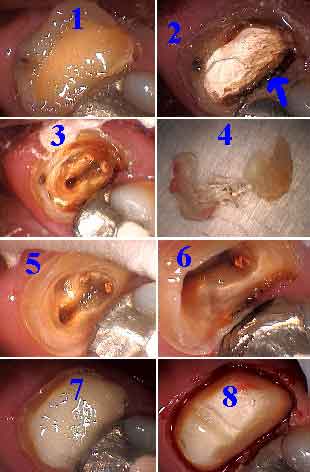
Tooth crown buildup after gingivectomy -cutting the gum. The gum is cut so that healthy tooth can be obtained – from under the gum line – to build on.
1) Old tooth composite.
2) Composite removed, recurrent tooth decay is visible.
3) Pulp chamber with decay present.
4) Old composite came out in one piece (not bonded).
5) Tooth decay removed and drilling into root canal orifices for bonding retention.
6) Depth of preparation into pulp chamber.
7) Dental bonding is in place before tooth preparation.
8) Tooth preparation and gingivectomy; note the occlusal retention groove.
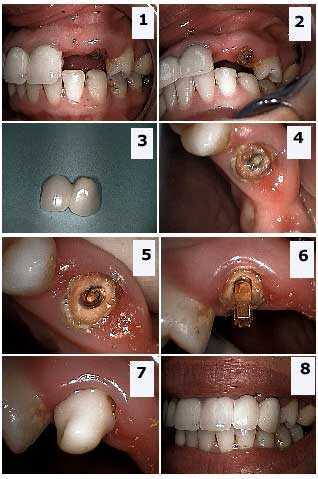
Dental crown and teeth bridge repair. 1) – 4) Patient presented with a two-unit porcelain fused to metal dental bridge that had come out. The bridge abutment was on the upper left canine #11 and it was cantilevered in the upper left lateral position #10. The patient sought a temporary repair though he knew this would ultimately sacrifice the already badly damaged, and possibly untreatable, canine. 4) The canine abutment had significant tooth decay. 5) The decay was removed from the canine and a post space created. 6) A pre-fabricated post was cemented into place. 7) Chemically cured dental bonding material was added to the post and the bridge was placed on top, and occasionally removed, during hardening. 8) The dental bridge was cemented onto this new abutment using chemically cured bonding material and a little bonding was also added to the distal of the left central #9 to help support the cantilever during vertical loading. The patient understood the need for more comprehensive care when circumstances allow.