Before and after photos on dental crown complications and problems performed in our General Dentistry office.
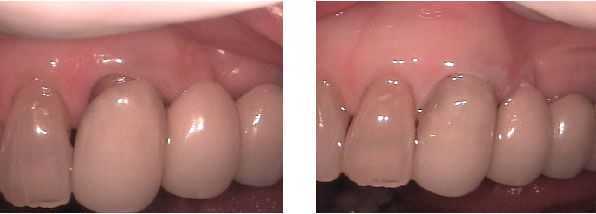
Dental bonding on the tooth root showing around a crown margin. Before and after photos following cosmetic dentistry. The procedure took 15 minutes.
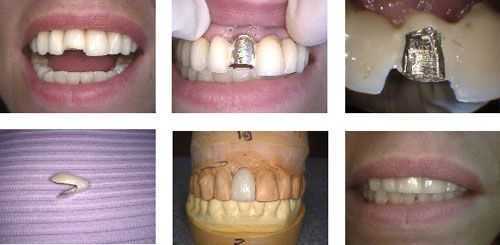
These pictures show how to repair broken porcelain on a dental crown that is part of a 12 teeth bridge. Fabricate a 3/4 dental crown to fit over the metal frame of the 12 teeth fixed porcelain metal dental bridge. Use dental cement to attach it.
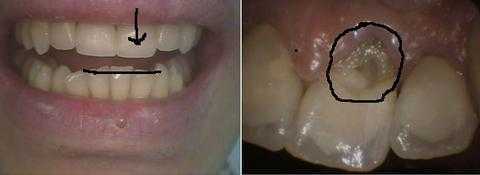
A Russian investment banker came from Moscow for fast and aesthetic replacement of an upper front tooth. Understanding the etiology of the fracture, and treating it, will help prevent recurrence. In this case, the supraeruption of the lower front teeth need treatment.
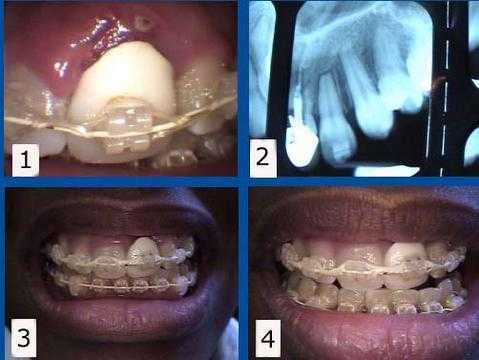
Orthodontic complications. 1) & 2) This braces patient presented with a failing tooth #9 under an unattractive dental crown. This tooth was maintained for one year while her teeth were being orthodontically aligned. The #9 tooth root was then extracted from under the crown to allow the gum and bone to heal with about eight months remaining to complete her braces. 3) & 4) This rootless crown #9 is being held in place only by the orthodontic bracket and wire. This patient preferred to keep this unattractive crown during her ortho treatment to minimize simultaneous cosmetic changes, but a cosmetic temporary crown could also have been used during this time. A dental implant will be placed about three months following the extraction. The second stage implant connection will coincide with the braces removal.
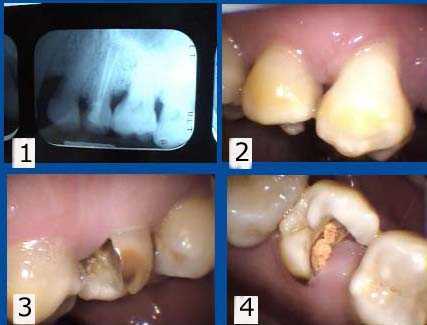
Dental Complications. Tooth #13 has been left exposed for over a year since the root canal temporary filling fell out. 1. Current x-ray. 2. Buccal photo. 3. Palatal photo. 4. Occlusal photo. Treatment options: Extraction and then tooth replacement or retreat the root canal, post and core, crown lengthening gum surgery and crown.
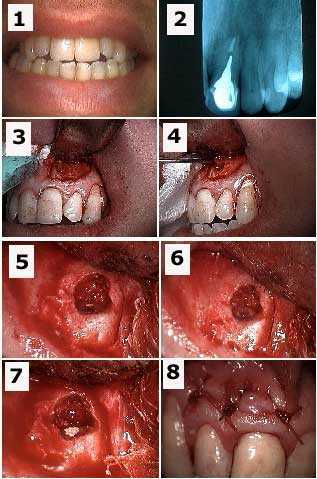
Root canal problem under a dental crown. The upper front tooth #9 needs an apicoectomy and retrograde filling to treat a failing root canal. 1) Pre-op photo. 2) X-ray of tooth #9 with a cast post and root canal filled with gutta percha to the apex. 3) Initial semi-lunar incision exposes the bony fenestration. 4) Cystic tissue is being pulled through the osteotomy with a forceps. 5) Osseous preparation – drilling into bone – exposes the tooth apex with the gutta percha visible. 6) Preparation into the root apex to make room for the retrograde filling. 7) Retrograde filling material (MTA, Mineral Trioxide Aggregate) placed into apex preparation. 8) Sutures.
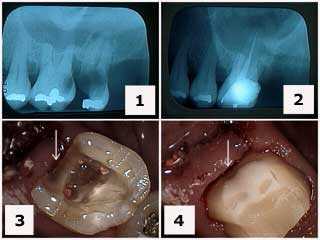
Tooth decay complication. Treatment of a severely decayed upper left first molar. 1) Initial x-ray. 2) X-ray following extraction of tooth #15 and root canal therapy on tooth #14. Note the gingival extent of the decay. 3) Tooth preparation following root canal therapy and the removal of the distal decay. 4) Final tooth preparation of the composite crown build-up. Note how the distal tooth preparation extends gingivally beyond the composite to tooth.
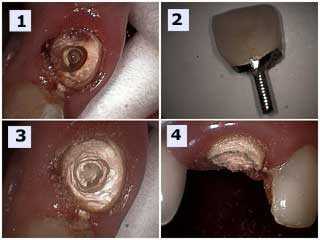
An upper anterior porcelain tooth crown failure is shown because of tooth decay at the gum line. 1) A cavity in this tooth is seen in this image. 2) The failed porcelain crown with the prefabricated post still in it. 3) and 4) Tooth preparation to determine the necessity for crown lengthening if the cavity extends far below the gum.
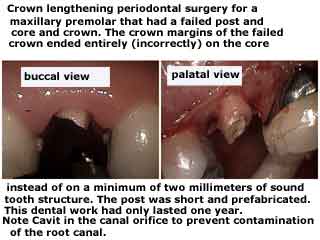
A tooth cavity problem. Crown lengthening periodontal gum surgery for a maxillary premolar tooth that had a failed post and core, and dental crown. Dental caries – tooth decay – can be seen in the photos. Note: last sentence reads “Note Cavit in the canal orifice to prevent contamination of the root canal.”
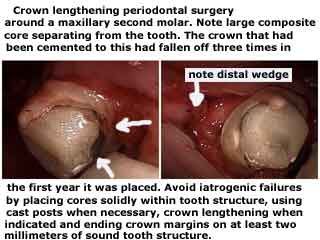
Dental crown failure. Crown lengthening periodontal gum surgery around a maxillary second molar tooth. A large, failing composite core is also shown separating from the tooth. Note: last sentence reads “…Note: last sentence reads “…crown lengthening when indicated and ending crown margins on at least two millimeters of sound tooth structure.”
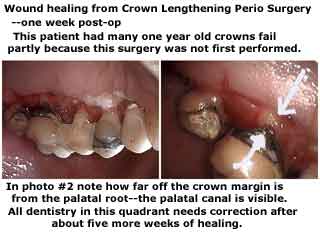
Wound healing following crown lengthening periodontal gum surgery. This was necessary to treat a tooth that had a cavity below the gumline. One week post op pictures. Note: last word reads “healing.”
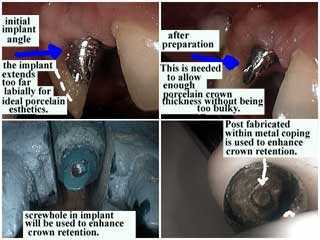
Dental implant cosmetic problems. The dental implant initially extended too far labially for ideal porcelain dental crown aesthetics. After the preparation, there is now enough room for the ideal dental crown thickness of porcelain. The screw hole in the dental implant abutment is used to enhance crown retention. The post fabricated within the metal coping is used to enhance the tooth crown retention.
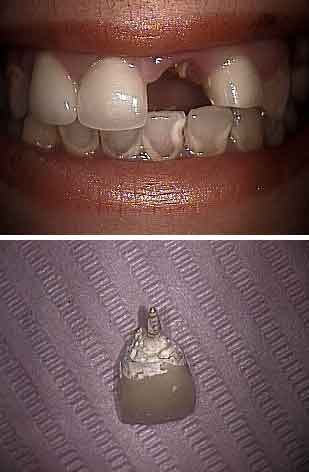
Problems with dental crowns. Emergency visit from a new patient for a dental crown (#9) having come out of the mouth. The crown appears to have been cemented with lots of excess cement with the hope of providing retention. It won’t work. The crown margin appears to end on the post/core, not solid tooth structure. This also won’t work.
The high smile lipline aesthetically prevents crown lengthening gum periodontal surgery. The patient was informed that extraction and then a dental implant was ideal treatment. The tooth cap was recemented at patient request after being informed and signing informed consent that it could easily come out and be swallowed.
The high smile lipline aesthetically prevents crown lengthening gum periodontal surgery. The patient was informed that extraction and then a dental implant was ideal treatment. The tooth cap was recemented at patient request after being informed and signing informed consent that it could easily come out and be swallowed.
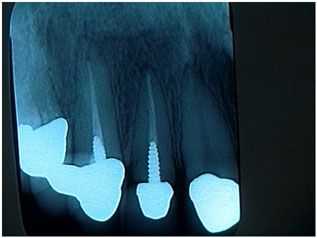
Potential dental problem. This new patient was very nice and presented for what she believed would be a quick recementation of a single, upper lateral tooth cap. Many dental crowns and root canals were recently completed by the dentist near her home with whom she had a good relationship. She worked and just requested that I replace this new crown with dental cement.
I chose not to treat this patient and instead recommended that she go back to her current dentist for care after explaining these reasons: 1) It appeared that the crown is completely seated on the post and core instead of being seated on a minimum of two millimeters of sound tooth structure. 2) The post preparation was short and should have been nearly double its length for strength and retention. 3) The post was prefabricated and not cast; this will also decrease its strength and retention.
I did not want to take out the loose crown and then find that I also had a loose post and core in my hand. Proper care might indicate a new, longer cast post and core, possible crown lengthening, and a new crown. Crown lengthening surgery could likely affect the crown margins on all the other new anterior crowns.
Once you touch it, you own the problem. Both the dentist and patient need to agree what might happen, and what might need to be done, if an “easy” repair turns out to be quite a big problem. This philosophy is both fair and appropriate for the patient and will save a lot of young dentists from having a major, unexpected problem. All things considered it was not worth getting started. The patient was appreciative of my assessment and was happy to return to her dentist for the repair with an understanding of what potential problems to be aware of.
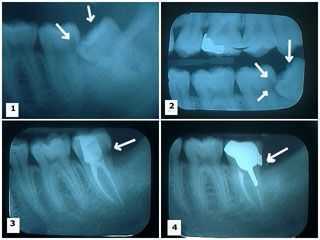
Wisdom tooth problems – possible damage to the adjacent tooth. Rationale for wisdom tooth extraction: damage to the adjacent second molar. 1) – 2) Two x-rays showing a lower wisdom tooth impacted on an angle and pushing into the adjacent second molar causing a large cavity. 3) X-ray shows the wisdom tooth was removed and the second molar following root canal therapy with the large distal cavity still present. 4) Cast gold post and core and crown in place. Note the distal crown margin completely covers where the distal cavity was removed.
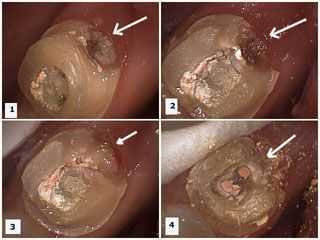
Why extract wisdom teeth? Damage to the adjacent second molar tooth can occur. These photos show preparation of the second molar to remove the distal cavity after root canal was performed on it and the wisdom tooth was removed. 1) – 2) Decay is present in the distal area of the second molar. The temporary dental filling material is visible in the occlusal opening following root canal therapy. 3) Decay removed. 4) Temporary filling material removed showing gutta percha in root canal orifices prior to cast post and core preparation. How to pictures.
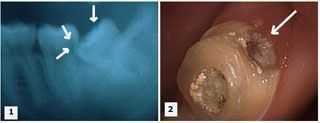
Why wisdom teeth should be extracted: The adjacent second molar tooth could develop a big cavity where the wisdom tooth grows into it. 1) X-ray showing a lower wisdom tooth impacted on an angle and pushing into the adjacent second molar causing a large cavity. 2) The cavity is present in the distal area of the second molar tooth. Temporary filling material is visible in the occlusal opening following root canal therapy.