Photos on how to drill or prepare teeth for crowns created in our General Dentistry office.
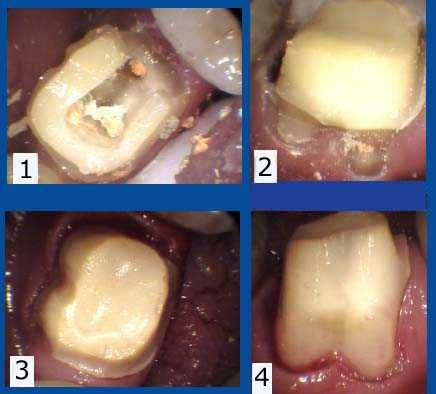
How to drill a tooth pictures. Crown buildup of a lower molar tooth following root canal therapy. 1) Pre-op occlusal photo. 2) Buccal photo showing severe root notching after the disto-occlusal was filled. 3) The restored occlusal photo. 4) The restored buccal photo after initial porcelain teeth cap preparation.
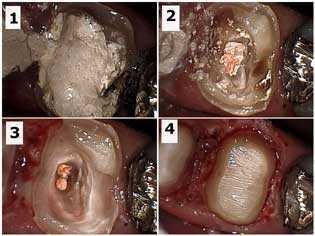
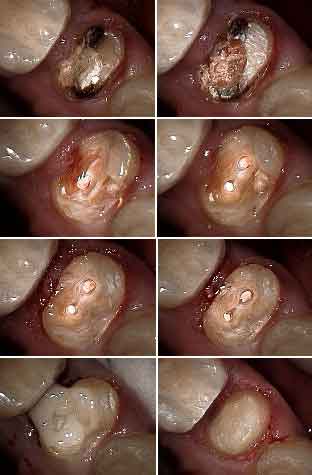
How to Pictures: Crown build-up of a first molar tooth after root canal therapy and drilling away dental caries. 1) Cavit, temporary filling material, in the tooth following root canal therapy. 2) Gutta percha exposed in the pulp chamber after removal of the Cavit, temporary dental filling material. Dental decay is still present. 3) Decay removal and preparation into the canal orifices to aid in mechanical retention of the dental bonding material core. 4) Final preparation after electrosurgery in the distal section of the tooth.
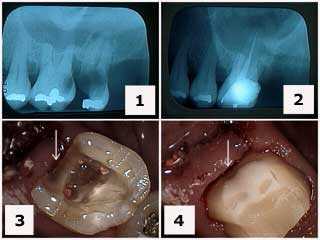
How to treatment pictures and x-rays of tooth decay in a severely decayed upper left first molar. 1) Initial x-ray. 2) X-ray following extraction of tooth #15 and root canal therapy on tooth #14. Note the tooth decay going below the gum line. 3) Tooth drilling preparation following root canal therapy and the removal of the distal tooth cavity. 4) Final tooth drilling of the composite crown build-up. Note how the distal tooth preparation extends towards the gum beyond the composite to tooth.
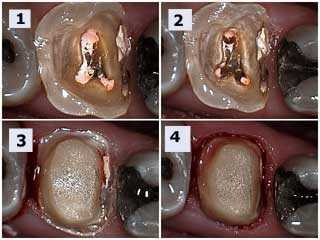
How to pictures of dental crown buildup following root canal therapy in a molar tooth. 1) Following root canal therapy. 2) Tooth preparation for crown buildup. Note preparation into root canal orifices creates mechanical retention of the core. 3) Initial shoulder preparation. 4) Bevel placement. This tooth needs crown lengthening periodontal gum surgery.
How to pictures showing a dental crown build-up in an upper premolar tooth following root canal therapy and crown lengthening periodontal gum surgery. There was adequate remaining tooth structure so a cast post and core was not necessary. Consider preparation into the root canals to add mechanical retention for the bonded composite.
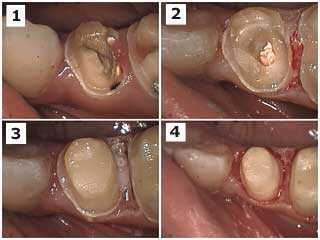
How to pictures showing a tooth crown build-up and crown preparation following root canal therapy. 1) Cavit temporary filling material visible in this photo after removal of temporary crown. 2) Preparation into pulp orifice to remove coronal gutta percha. 3) Crown build-up after initial shoulder preparation. 4) Final tooth preparation, drilling.
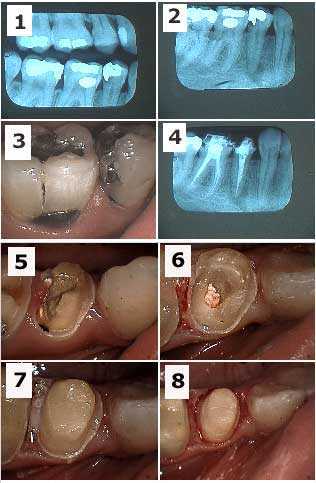
How to pictures and x-rays for a patient who presented in pain on her lower right side. Root canal, crown build-up and dental crown preparation – drilling – was performed for both the molar and premolar teeth. The premolar tooth is the focus in this series of photos.
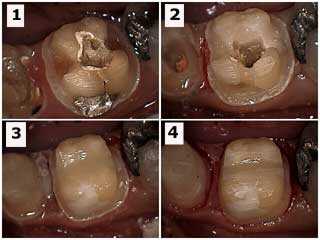
How to pictures of a dental crown build-up and tooth crown preparation – drilling – following root canal therapy. 1) Cavit temporary dental filling material is seen in this image after removal of the temporary crown. 2) Preparation into pulp orifice – root canal filling material – to remove coronal gutta percha – root canal filling material. 3) Crown build-up after initial shoulder preparation of the crown margin. 4) Final tooth preparation.
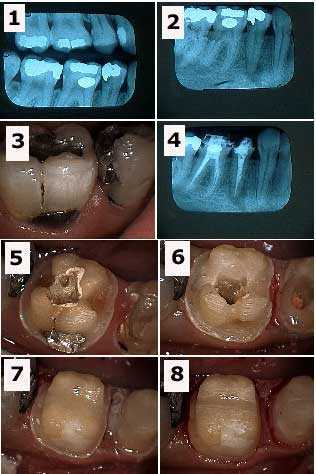
How to pictures and x-rays for a dental patient who presented in pain in her lower right side. Root canal therapy, crown build-up and dental crown preparation was performed for both the molar and premolar teeth. The molar tooth is the focus in this series of photos.
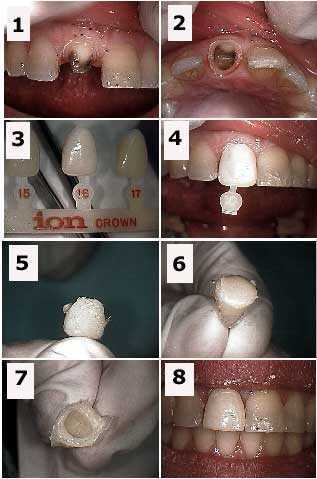
How to make a provisional dental cap pictures – Temporary crown fabrication on an upper central incisor tooth using an ion crown form. Photos 1) & 2) Dental crown preparation – drilling. 3) Ion crown guide is used to pick a #8 crown tooth form that best approximates the mesio-distal interproximal diameter needed. 4) The inciso-gingival length of the chosen crown form is reduced from the gingival side and then checked for fit over the crown preparation. 5) and 6) The crown form ready for acrylic reline. Note Vaseline on the labial surface to prevent reline acrylic from sticking to the polished surface of the ion crown form. 7) Gingival photo of the crown form after initial removal from the tooth and before final carving. 8) The cemented crown form. Again note that Vaseline is on the labial surface to prevent temporary dental cement from damaging the surface.
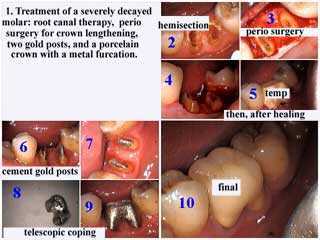
These photos show how to treat a big cavity in a molar tooth:
– root canal therapy.
– gum surgery to expose more tooth above the gum.
– two gold posts.
– porcelain tooth crown with a metal furcation.
– root canal therapy.
– gum surgery to expose more tooth above the gum.
– two gold posts.
– porcelain tooth crown with a metal furcation.
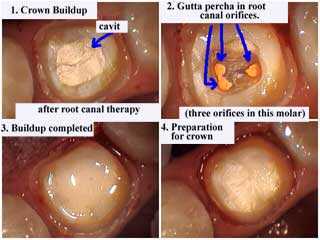
How to pictures – Tooth Crown buildup after root canal therapy. Then preparation for a dental crown.
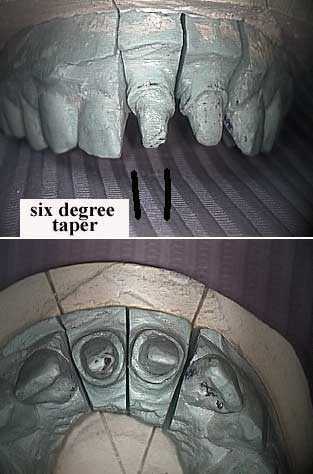
How to photos – All porcelain tooth crown preparation – drilling – for upper central incisor teeth (master model). The width of the shoulder for the crown margin should be around 2 mm. Over preparation – excessive drilling – will weaken the tooth; under preparation – inadequate drilling – will weaken the porcelain because there won’t be enough room for sufficient thickness of porcelain on the final dental crown. The teeth impression should extend into the gum sulcus to give the dental lab technician a clean – accurate – finish line.
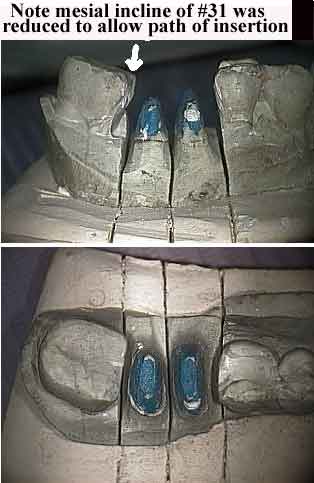
How to drill a tooth pictures – Tooth drilling preparation of tooth #30 following hemisection (master model). The individual roots should be prepared to be relatively parallel. The individual metal copings showing relative parallelism will join in a metal furcation. Porcelain will then be added to make the final dental crown look like one tooth.
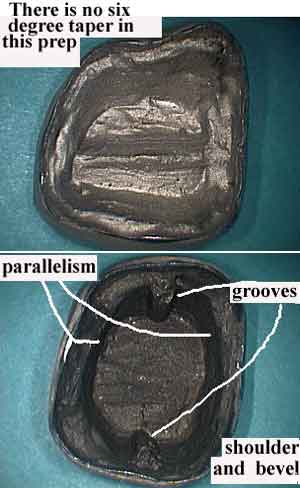
Dental Crown Retention – how to keep a dental cap from falling out of the mouth. Which crown shown in these photos will be more retentive following cementation? Drill teeth for dental crowns in a manner which will avoid obvious failure. When drilling a tooth for a dental crown the outer tooth walls should be nearly parallel, showing only a six – 6 – degree taper.
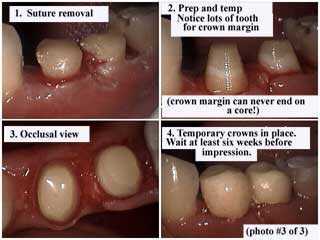
Images showing teeth after gum surgery, suture removal and teeth drilling. [*Notice lots of tooth for crown margin — dental crown margins can NEVER end completely on a composite core!]. Wait at least six weeks after the temporary crowns are placed before taking an impression of these teeth for final crowns.
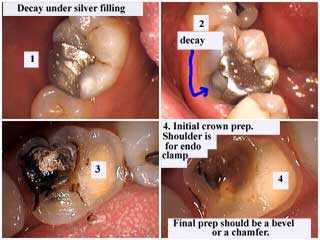
There is tooth decay under this silver dental filling. The initial crown preparation has a shoulder crown margin finish line because root canal is expected and so room is left on the tooth to help hold the endodontic clamp. The final prep crown margin should have a bevel or a chamfer.
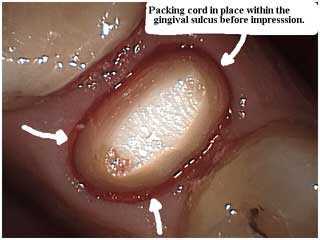
Image showing to to pack dental retraction cord in the gum within the gingival sulcus before taking teeth impressions.
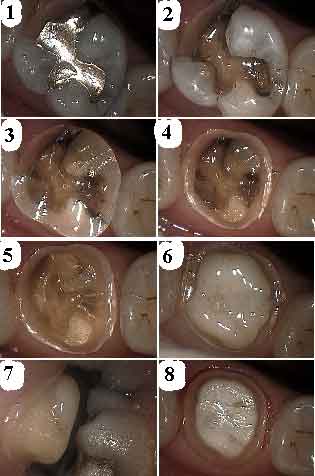
How to drill a tooth pictures – dental crown preparation and crown buildup:
1) Disto-palatal fracture of #3
2) Amalgam silver filling removal and evaluation (patient had previously been informed about the probability of needing a crown for this tooth).
3) Occlusal reduction for crown.
4) Circumferential reduction for crown.
5) Stain and tooth decay removal.
6) Dental Bonding for crown buildup (unprepared).
7) Checking occlusal clearance.
8) Final tooth preparation – drilling – including placement of bevel at the crown margin finish line.