Before and after photos on evaluation of jaw bone alveolar ridge and cortical bone performed in our Gum Disease Treatment office.
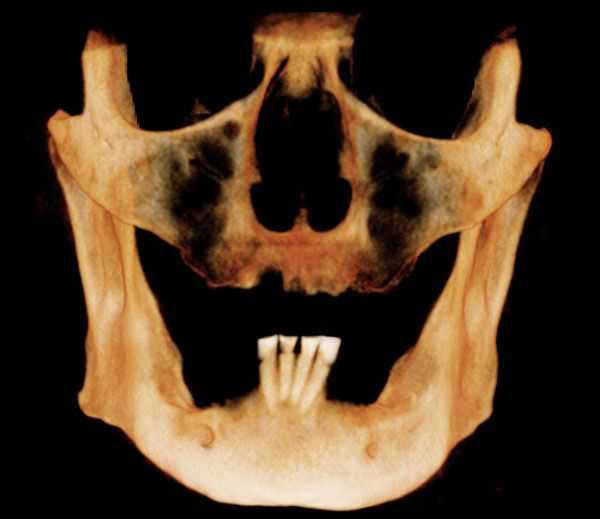
A CT (CAT) scan of the upper and lower jaws – the maxilla and mandible. This shows the volume of bone into which dental implants may be placed.

An atypical jaw bone pattern was noted on a 46 year old female during a routine set of dental x-rays. A Panorex also showed something unusual. A subsequent oral surgeon exam revealed no expansion of lingual or buccal plates. The teeth have not moved for many years though #30 was extracted many years prior. A moderate depression was noted on the buccal aspect of teeth #’s 29 & 30. The patient exhibited mild discomfort in this area upon palpation. A CAT scan confirmed the bone loss and an exploratory surgery was performed and can be seen in the pictures. The clinical impression was that of a lateral periodontal cyst. The pathology report showed it to be mildly inflamed fibrous tissue. Note the importance of careful evaluation and diagnosis of bone patterns in regular dental x-rays.
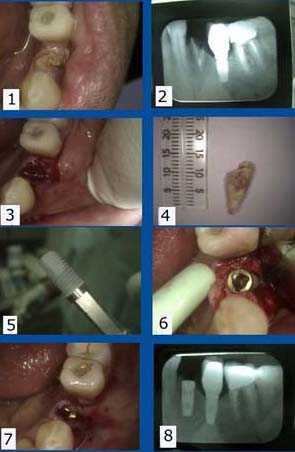
Single tooth dental implant placement after extracting a fractured (and non-infected) lower left first premolar tooth. The lower left second premolar position already has a dental implant as well. 1) – 2). Pre-op picture showing the fractured tooth, clinically and radiographically. 3) Socket exposed and ready for implantation. 4) The extracted tooth. 5) Photo of a Replace titanium threaded implant ready for insertion. 6) The implant was inserted into mandible using a slow speed handpiece. 7) Implant covered and surrounding tissue sutured using 3-0 chromic gut dissolvable sutures. 8) Post-op x-ray.
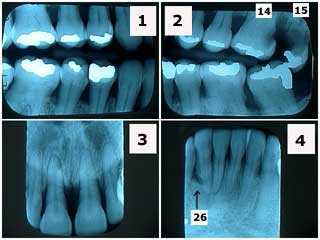
X-rays showing severe periodontal gum disease in a 40-year-old phobic female. Note the significant horizontal bone loss and the lack of radiographic calculus. Tooth #26, adjacent to the vertical bony defect, is probably hopeless. This patient was treated with two rounds of root planing and scaling then periodontal reevaluation. Tooth #15 was extracted and #14 had root canal therapy and a crown.
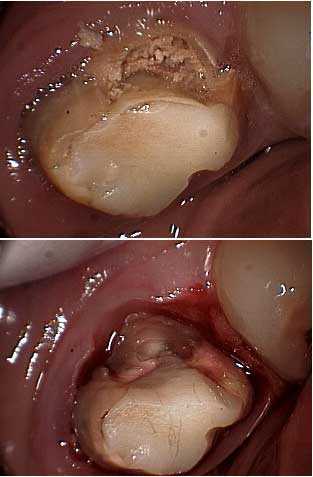
Picture of tooth decay – cavity – around a molar. This has to be removed before referring the patient for crown lengthening periodontal gum surgery so the periodontist knows how much osseous reduction is necessary.
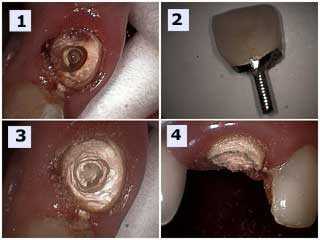
An upper anterior porcelain crown failure is shown. 1) Obvious tooth decay seen in the photo. 2) The failed porcelain crown with the prefabricated post still in it. 3) and 4) Tooth preparation to determine the necessity for crown lengthening.
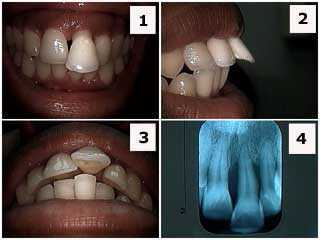
Patient presented with her upper left central incisor flared labially out of the mouth.
1) Front view photo. 2) Side view photo. 3) Occlusal view photo. 4) x-ray, radiograph. The patient, who was in her twenties, was informed about the severe periodontal gum condition and that the prognosis for this tooth was guarded at best. She was informed that a thorough check-up was indicated. Orthodontics, braces, is contra-indicated here because of the severe periodontal problem. Treatment, if the patient accepts treatment on a tooth with a guarded prognosis, could include: scaling and root planing, open flap debridement if necessary, root canal therapy and crown (for aesthetics) and possibly a splint. Treatment, otherwise, could include just scaling and root planing and incisal adjustment. I personally would not rush to extract this tooth though the patient needs to be aware of this possibility.
1) Front view photo. 2) Side view photo. 3) Occlusal view photo. 4) x-ray, radiograph. The patient, who was in her twenties, was informed about the severe periodontal gum condition and that the prognosis for this tooth was guarded at best. She was informed that a thorough check-up was indicated. Orthodontics, braces, is contra-indicated here because of the severe periodontal problem. Treatment, if the patient accepts treatment on a tooth with a guarded prognosis, could include: scaling and root planing, open flap debridement if necessary, root canal therapy and crown (for aesthetics) and possibly a splint. Treatment, otherwise, could include just scaling and root planing and incisal adjustment. I personally would not rush to extract this tooth though the patient needs to be aware of this possibility.
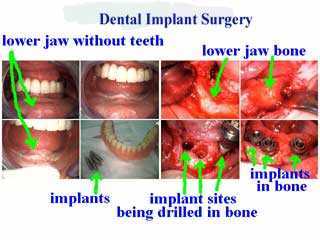
Evaluation of bone for dental implants during surgical placement in the lower jaw. These extra oral pictures show surgery on my own grandmother at age 96.
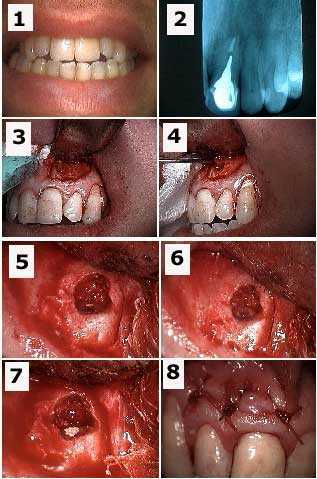
Apicoectomy tooth #9 and retrograde filling to treat a failing root canal. 1) Pre-op photo. 2) X-ray of tooth #9 with a cast post and root canal filled with gutta percha to the apex. 3) Initial semi-lunar incision exposes the bony fenestration. 4) Cystic tissue is being pulled through the osteotomy with a forceps. 5) Osseous preparation exposes the tooth apex with the gutta percha visible in this picture. 6) Preparation into the root apex to make room for the retrograde filling. 7) Retrograde filling material (MTA, Mineral Trioxide Aggregate) placed into apex preparation. 8) Sutures.
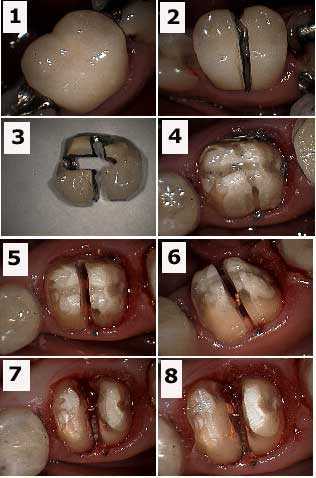
Crown removal and tooth root resection (hemisection) pictures. 1) Pre-op crown photo. 2) Initial preparation through crown. 3) Crown after removal. 4) Tooth after crown removal. 5) Preparation through composite core. 6) Gutta percha (orange color) is visible in this photograph. 7) Hemisection completed. 8) Gutta percha is exposed and requires more composite to seal it within the tooth after crown lengthening periodontal surgery.
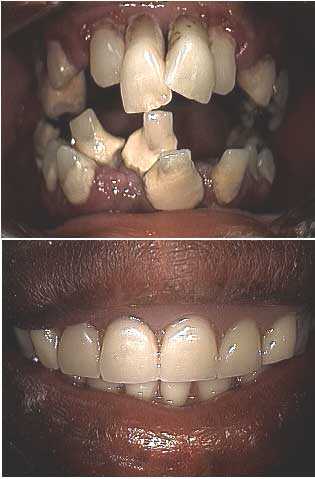
Full mouth reconstruction of a 36 year-old female with severe dental fear. Initial result: two visits. Photo #1 of 2 – before and after pictures.
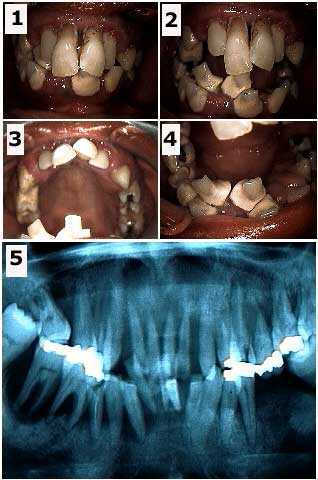
Full mouth reconstruction of a 36 year-old female who has dental phobia. X-ray and pictures. Initial visit. It is important to determine what teeth, if any, may be saved at least temporarily. It is easier for a patient to emotionally adjust to a temporary prosthesis that has at least some amount of retention provided by natural tooth abutments. The teeth chosen were #6, 11, 22 and 28. The decision to fabricate a removable immediate partial denture, rather than a fixed lab-processed temporary bridge, was determined by the particular weakness of tooth #28. The patient was informed that the immediate prosthesis was to be used for the healing phase and that the four remaining abutments, particularly #28, might be subsequently extracted. Photo #2 of 2. Pre-op extra oral pictures and xray.
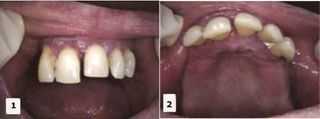
Dental implant surgery with sinus elevation and bone graft. Pictures -Part 1 of 5. A 64 year-old female presented with five very loose anterior maxillary (upper) teeth and missing all posterior maxillary teeth. She wanted a fixed prosthesis (non-removable caps). The patient had six dental implants placed in the mandible (lower jaw) with fixed caps about four years earlier. The panorex x-ray showed an atrophic maxilla with 4mm of bone, which required a bone graft and sinus lift for dental implants. The agreed treatment plan consisted of extractions of all anterior teeth, sinus lifts with platelet-rich plasma (PRP), and simultaneous implant placement. Pre-op photo.
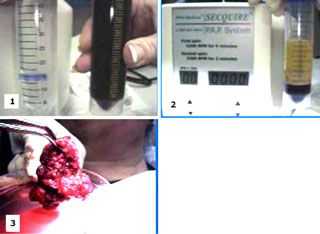
Dental implant surgery with sinus elevation and bone graft pictures. Pictures – Part 2 of 5. 1) A Platelet Concentration Specialist obtained the patients’ own blood (60 cc) and 2) centrifuged it to obtain 6-8 cc of platelet-rich plasma (PRP) and 10 cc of platelet-poor plasma (fibrin glue). 3) The PRP was mixed with the patients’ bone and freeze-dried bone, and then activated with thrombin. This mixture was then used as graft material for the sinus lift in and around the implants and the jawbone. Centrifuge photo.
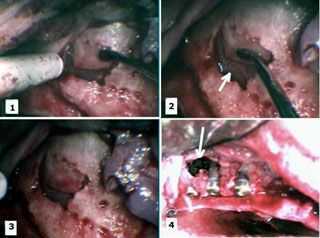
Dental implant surgery with sinus elevation and jaw bone graft. Pictures – Part 3 of 5. 1) – 3) A sinus lift was performed by opening a small “window” into the sinus without perforating the Schneiderian Membrane. The window was gently elevated along its superior fracture line and the membrane peeled off of the sinus floor, creating a new, more superior sinus floor. 4) The implants were carefully placed to make sure they were stable. Notice that the width of the alveolar ridge was inadequate for the implants necessitating the PRP graft. The most distal two implants can be seen extending vertically into the elevated sinus. This entire area was covered with the PRP graft.
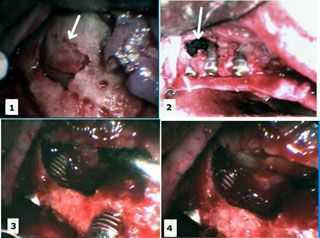
Dental implant surgery with sinus elevation and bone graft. Pictures – Part 4 of 5. 1) Sinus elevation. 2) Implants placed in the elevated sinus. 3) – 4) Close-up of the implant in the sinus with the new floor of sinus superiorly positioned. This entire area was covered with PRP graft.
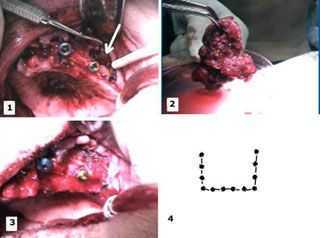
Dental implant surgery with sinus elevation and bone graft in the upper jawbone. Pictures – Part 5 of 5. 1) Palatal view of the implant site showing the area of the sinus elevation. 2) – 3) The graft (PRP + patients’ bone + freeze-dried bone) material was then placed in the sinus cavity and around the implants. The wound was then closed primarily and the graft was allowed to consolidate for 9 months. 4) Pattern of preparation in bone for sinus elevation.