Before and after photos on root resection and hemisection mean cutting roots performed in our Gum Disease Treatment office.
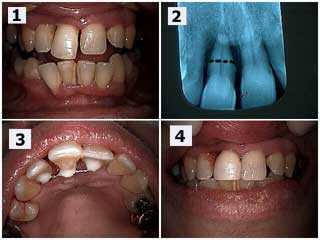
The upper right central incisor tooth (#8) was very loose and the patient wanted to try to save it. 1) Before photo. The upper right central incisor has extruded – grown down vertically – and moved labially outward horizontally and a diastema teeth gap space has occurred. 2) A radiograph x-ray shows severe bone loss. The black dotted line shows the location for a potential root resection if necessary. Scaling and root planing was performed after the teeth splint was placed and the patient will see the Periodontist in three months to reevaluate periodontal healing and the potential need for the root resection. 3) Palatal photo of the dental splint between teeth #’s 7 – 9. 4) After photo – same day. Notice the diastema teeth gap was closed with dental bonding to hide the splint and the incisal edge of #8 was shortened.
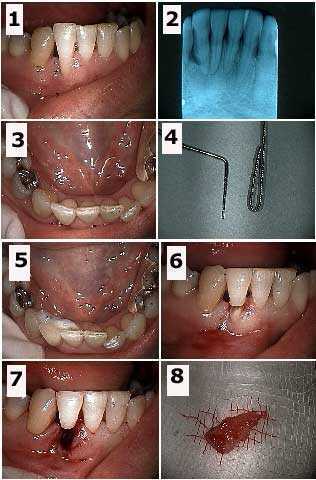
Root resection of a hopeless tooth #26 and splinting the coronal portion of this tooth to the adjacent teeth in a 40 year-old female. How to pictures, 1) – 3) Before photos. 4) The wire used for the teeth splint next to a periodontal probe. The wire is doubled to prevent the tooth from rotating around it after placement. 5) The teeth splint is glued to the lingual surfaces of teeth #’s 25 and 27 using dental bonding material. 6) Root resection – Initial preparation drilling through the mid-length of the tooth. 7) Following extraction of the tooth root. 8) The extracted tooth root. This patient has already been through two rounds of scaling and root planing. A Maryland Bridge will be placed after wound healing.
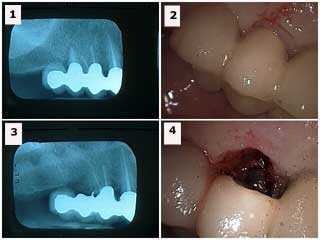
Root resection from under a porcelain fused to metal teeth bridge. 1) Radiograph xray shows the distal abutment with a combined root canal and gum infection. 2) Labial picture of the same tooth. 3) Radiograph x-ray following root resection (the metal chad in the area of the extracted abutment was later removed). 4) Labial photo following tooth root extraction. This area could be filled in with dental bonding after wound healing. The occlusion teeth bite on the distal cantilever was reduced. It opposed a lower full arch bridge so that supraeruption was not a concern. Treatment options include: i) sectioning – cutting – of the dental bridge and removal of the distal cantilever, ii) dental implants, or iii) reevaluate over time with the patient informed to reduce function in this area. The patient chose the last option and this 10 teeth bridge has been maintained in this manner for about ten years so far.
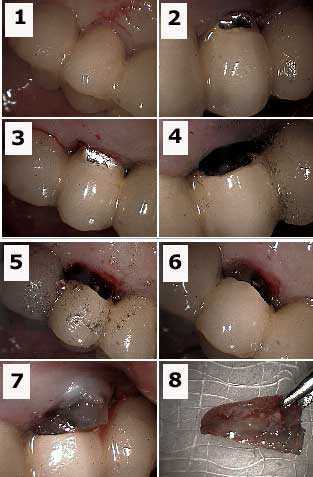
How to technique for root resection from under a porcelain fused to metal dental bridge. Pictures.
1) Labial photo of an abutment tooth with an endodontic-periodontal infection. 2) & 3) Initial preparation into the porcelain of the bridge with a diamond bur. 4) Labial photo shows preparation – drilling. The metal portion of the bridge is prepared with a steel bur. 5) Palatal picture shows the root resection preparation. 6) Labial photo shows the tooth root under the porcelain – gutta percha is visible in the tooth root. 7) Tooth root being extracted. The occlusal height of this root must first be reduced to allow it to exit. 8) The extracted tooth root.
1) Labial photo of an abutment tooth with an endodontic-periodontal infection. 2) & 3) Initial preparation into the porcelain of the bridge with a diamond bur. 4) Labial photo shows preparation – drilling. The metal portion of the bridge is prepared with a steel bur. 5) Palatal picture shows the root resection preparation. 6) Labial photo shows the tooth root under the porcelain – gutta percha is visible in the tooth root. 7) Tooth root being extracted. The occlusal height of this root must first be reduced to allow it to exit. 8) The extracted tooth root.
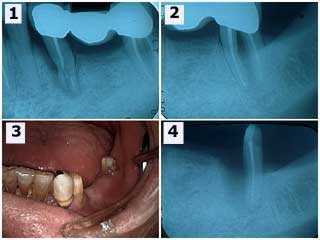
After root resection a molar tooth looks like a premolar tooth. 1) The initial radiograph x-ray shows a three-unit bridge after an accident and severe damage to the second premolar tooth. 2) The xray of the second molar show a furcation involvement and thickening of the periodontal ligament space around the mesial root. The second premolar and the mesial root of the second molar were extracted. The extraction of the mesial root of the second molar was accomplished with root resection. 3) Intra oral photo following wound healing. This elderly patient was informed about the long span of a new teeth bridge but he declined dental implants. He wanted a new fixed bridge anyway. 4) Radiographic healing of the distal root of the second molar after six weeks. The lesson here is the value of salvaging individual roots of molars through root resection.
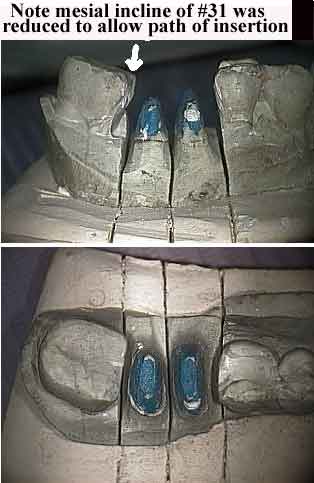
Preparation of tooth #30 following hemisection root resection shown on a master model. The individual tooth roots of this first molar tooth should be prepared for relative parallelism. The individual metal copings will join in a metal furcation. Porcelain will then be added to make the final dental crown look like one tooth.
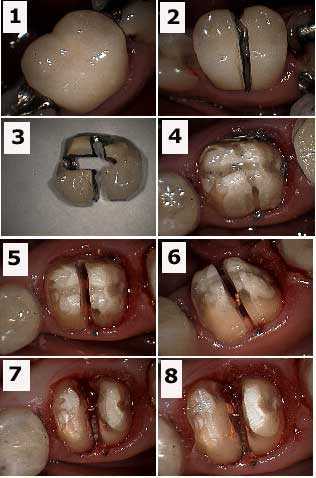
Dental crown removal and root resection – hemisection. How to perform root resection pictures. 1) Before photo of the dental crown. 2) Initial preparation drilling through the crown. 3) The tooth crown after removal. 4) Tooth after crown removal. 5) Preparation through the composite core as the root resection begins. 6) Gutta percha (orange color) is visible as the root resection continues. 7) After photo – Root resection hemisection completed. 8) Gutta percha – root canal filling material – is exposed and requires more composite resin bonding to seal it within the tooth after crown lengthening periodontal gum surgery.