The treatment of tooth decay can become quite complex in some patients. For example a large fixed bridge connected to many teeth could have cavities in one or more abutment teeth. It can also involve a group of teeth wherein the patient desires to avoid the need for root canal therapy. Above all patients should understand Indications for crowns and fillings. They should also learn that tooth decay, cavities and dental caries all mean the same thing. The Center for Special Dentistry® in midtown Manhattan focuses on the treatment of complex cases. Our cosmetic dentists provide white cosmetic fillings, Bondings in NY that are nearly invisible. Incidentally these photos on how to remove tooth decay or cavities in teeth were created in our General Dentistry office.
The cause of tooth decay is simple to understand
Cavities are caused by not keeping your teeth clean and having a high sugar diet.
We offer tooth decay treatment for complex problems – read reviews
Our team includes 16 cosmetic dentists, specialists and lab ceramists in one high-end midtown Manhattan office. In addition an MD-anesthesiologist offers several options for dental sedation. Nitrous oxide laughing gas is also available. As a result we are able to offer quick and comfortable general dentistry. We offer intelligent and honest diagnosis based upon 31+ years of experience. We use the finest materials and top labs.
Our dental patients also have access to top medical care
Moreover our patients have access to our affiliated team of 12 medical doctors in our building. We hope to help improve your overall health one step at a time.
How to remove tooth decay
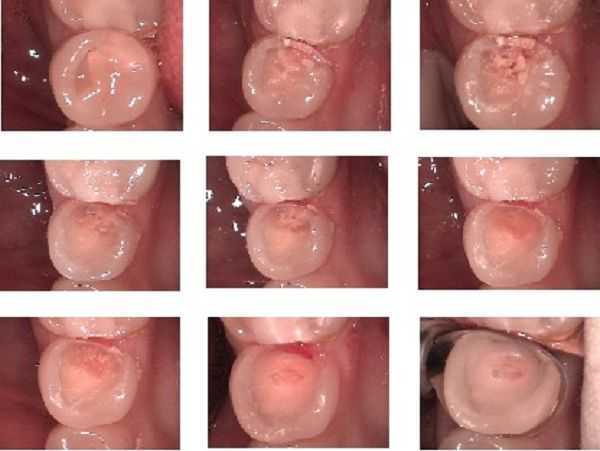
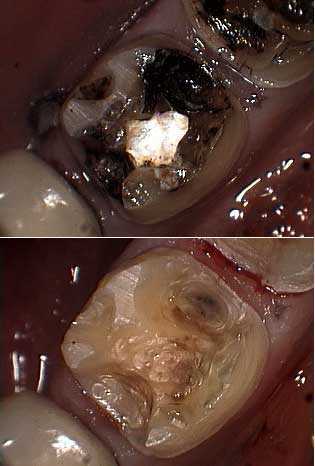
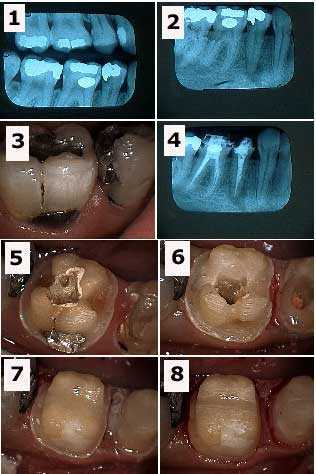
View these nine photos from left to right and then top to bottom. Generally the dentin looks smooth and intact until touching it with an explorer shows it to exhibit a diseased, oatmeal-like consistency.
Finally in the last photo the dental pulp, i.e. tooth nerve or root canal, appears in the last photo in the middle of the preparation through a thin layer of dentin.
How to remove tooth decay pictures
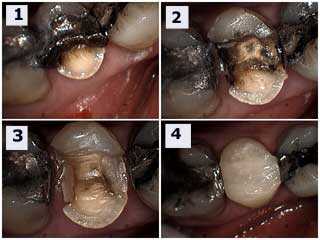
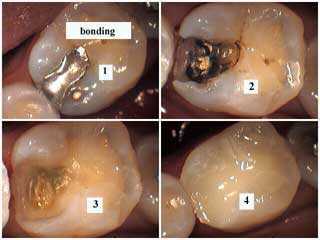
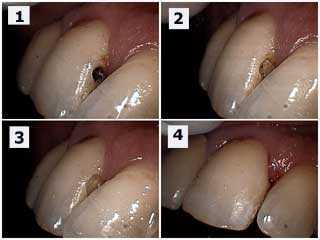
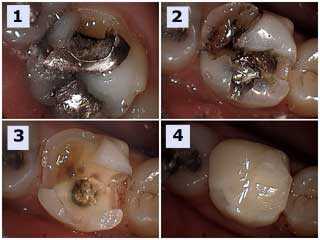
1) Dental bonding an upper premolar tooth where the buccal cusp has failed adjacent to a large old silver filling amalgam. 2) Silver filling removed. Don’t try to bond to this amalgam since its foundation is not very strong and decay is frequently beneath it. 3) Decay removal. 4) Final tooth bonding.
How to remove tooth decay from two upper front teeth
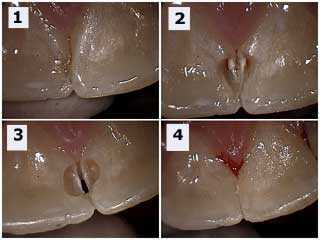
Dental caries or cavity removal from behind the front teeth. Then teeth bonding from the palatal side of these two upper central incisors.
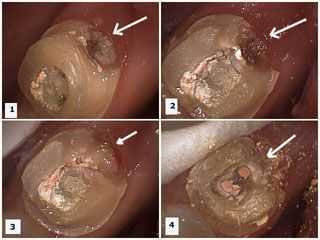
Pictures show how to remove recurrent tooth decay
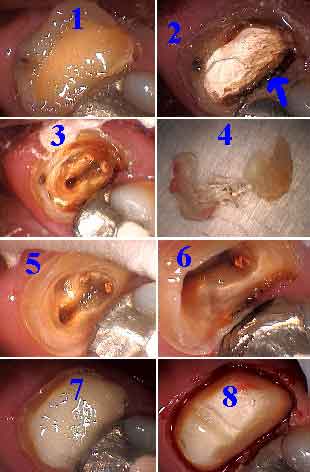
1) Old white filling composite.
2) Next composite removed, exposing recurrent tooth decay.
3) Pulp chamber with decay present.
4) The old composite was not bonded or glued to the tooth. Therefore it came out in one piece. This is not ideal dentistry.
5) Then decay removal and tooth drilling into the root canal orifices for the dental bonding retention.
6) Depth of preparation into pulp chamber.
7) Bonding is in place before tooth preparation.
8) Finally tooth preparation and gingivectomy; note the occlusal retention groove.
Photos of recurrent tooth decay
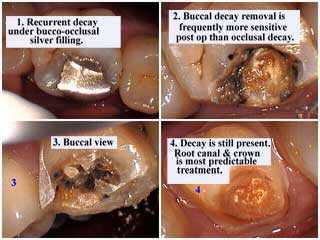
Removal of tooth decay avoids exposing the nerve or root canal
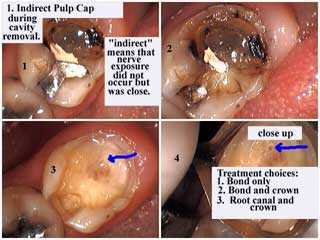
In brief treatment choices: 1) Dental bond only; 2) Dental bond and porcelain crown; 3) Root canal and a porcelain crown.
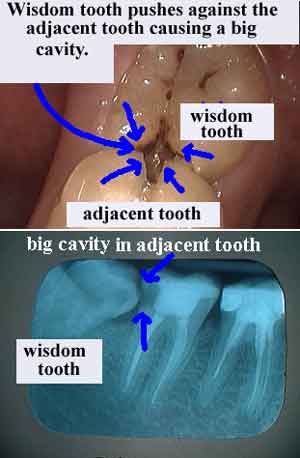
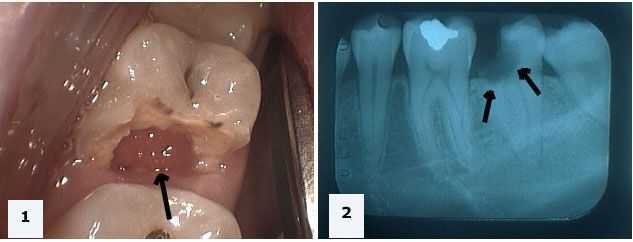
Retaining a wisdom tooth in the mouth longer than recommended causes tooth decay in the adjacent second molar
In this case this wisdom tooth is growing at an angle directly into the adjacent tooth causing a big cavity.
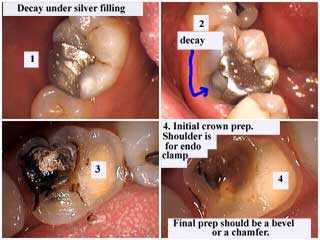
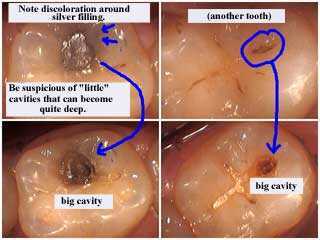
Deep tooth decay under a small silver dental filling
Incidentally apparently small cavities can grow much larger inside a tooth where the bacteria colonize.

Dental bonding technique shows tooth decay removal using a dental drill to avoid exposing the root canal
As a rule an indirect pulp cap procedure removes tooth decay and avoids nerve exposure.
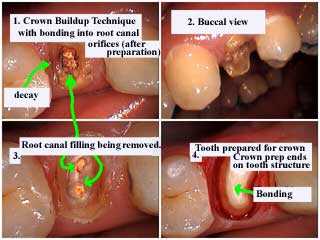
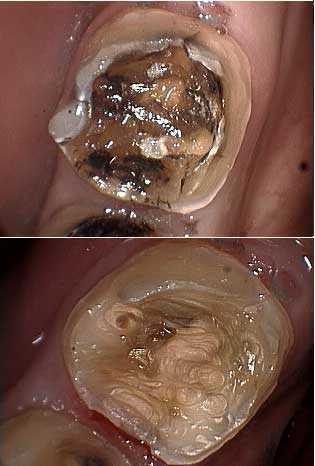
Tooth decay removal and crown buildup technique after root canal therapy
Bonding placement into root canal orifices after drilling away a little gutta percha. Notice the crown margin finish line ends on tooth structure and not the buildup.
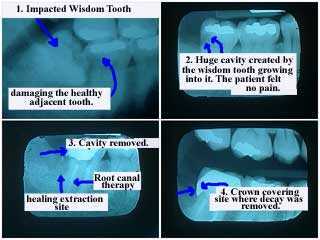
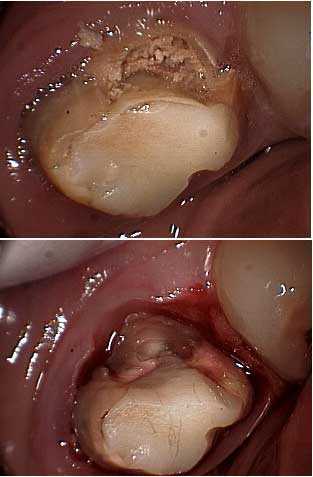
A large cavity created in the adjacent second molar by the wisdom tooth or third molar growing into it
The patient did not feel oral pain. Treatment: Root canal and dental crown – notice the crown covers the decay removal site.
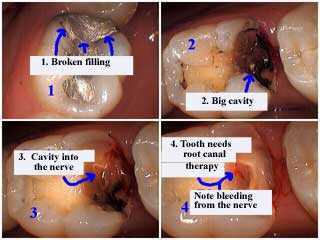
A big dental cavity extends into the nerve – red blood vessel – after removal of a broken silver tooth filling
This tooth needs root canal therapy. In particular bleeding is visible from the nerve or root canal.
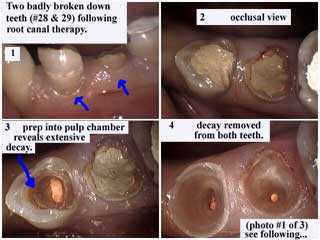
Treatment of two lower premolar teeth that had large dental caries into the nerve (#28 & 29) following root canal therapy
Initial preparation into the pulp chamber reveals extensive teeth decay. Lastly following teeth decay removal.
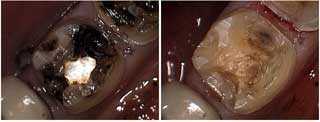
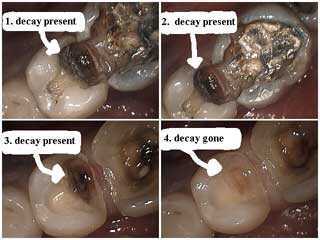
Tooth decay under a filling
Cavity and dental stain removal following removal of a silver dental filling.
Tooth decay seen under a fractured silver amalgam dental filling
Extensive tooth decay that needs extraction
Extract this tooth. Tooth decay extends through the pulp chamber into the furcation. In this case the prognosis is much less predictable than replacement with a dental implant.
Diagnose a cavity under a silver dental filling
Tooth decay and stain under and old silver filling
Tooth decay under a fixed porcelain bridge
Silver dental filling and tooth decay removal
Replacement of the silver amalgam filling with a white filling.
Tooth decay diagnosis
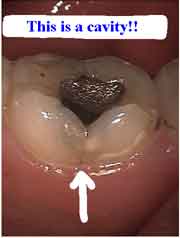
This is a cavity!
Diagnosis of tooth decay
A dental drill removes tooth decay.
The hole that results filled with a tooth-colored bonding material.
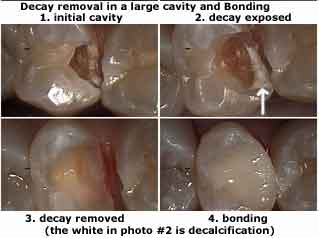
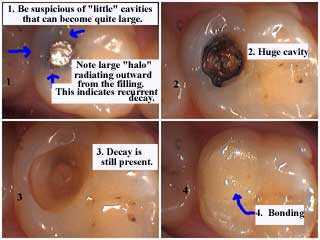
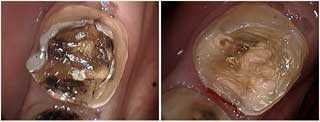
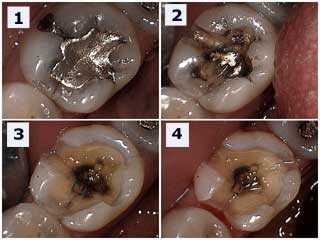
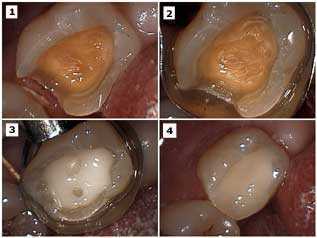
These pictures show dental decay drilled away in a tooth that has a large cavity
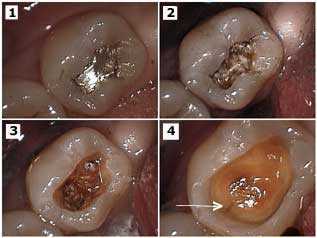
Then white tooth filling, dental bonding, placement. The last sentence reads: 4. Bonding. By the way behind the copyright it reads “The white in photo #2 is decalcification.”
Tooth decay and tooth pain
This patient presented with severe mouth pain. Tooth decay – cavity – removal is shown. This tooth is being prepared for root canal therapy and a dental crown – teeth cap. Before and after pictures are shown.
Tooth pain and tooth decay
This patient presented with oral pain. These pictures show the initial tooth cavity after drilling it away. Soon this tooth will receive root canal therapy and a dental crown.
Dental caries, tooth decay, in a molar tooth

Interproximal tooth decay is a cavity between teeth
Tooth decay or dental cavity removal between two front teeth
Emergency oral pain in the lower right jaw caused by tooth decay
How to pictures show the removal of a large silver amalgam filling and tooth bonding
Pictures show tooth decay removal and how to drill out a crack
Tooth decay, tooth pain and need for root canal therapy
Tooth decay, tooth pain and need for root canal therapy
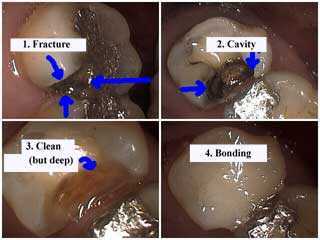
How to treat a tooth fracture
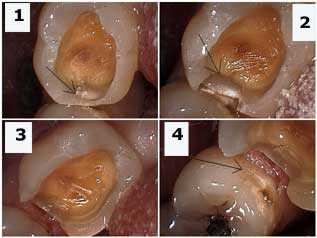
1) The entire lingual cusp of this upper premolar fractured and is separated from the tooth decay around the silver filling. 2) The lingual cusp is lifted away from the tooth. 3) The fractured cusp of the tooth. Next 4) The tooth after the removal of the fractured cusp. The black line indicates the anticipated extent of crown lengthening periodontal gum surgery that will be needed.
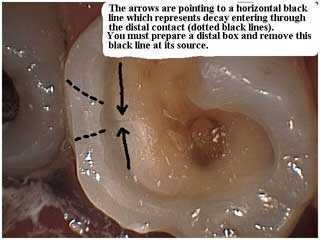
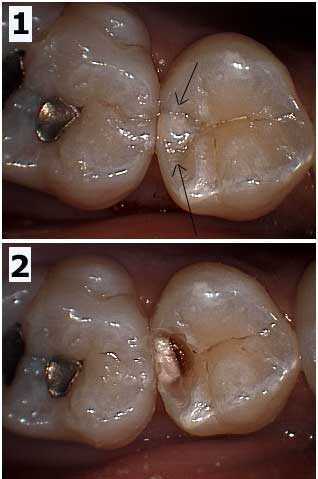
Tooth cavity preparation – how to remove tooth decay
Proper tooth cavity preparation requires the removal of crack lines that could contribute to recurrent tooth decay
Final tooth preparation – dental caries removal – before placement of direct-bonding material in a lower molar
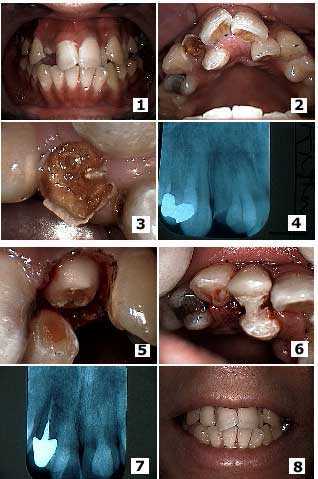
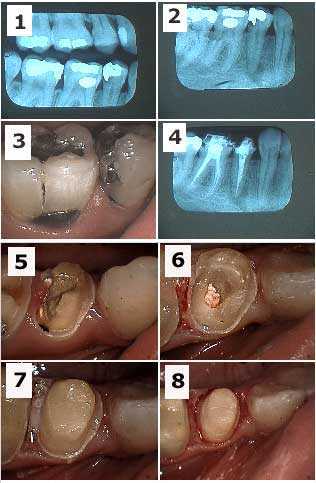
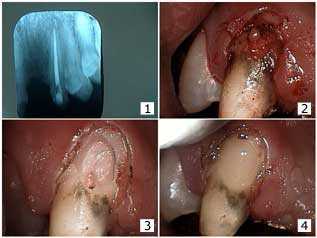
How to treat tooth decay in a maxillary lateral incisor adjacent to a palatally-displaced supernumerary tooth
Fig. 1 – 2. Initial presentation. Note the broken, decayed lateral tooth and the palatal location of the adjacent supernumerary tooth. Fig 3. Close up of the broken, decayed lateral and the adjacent palatally-displaced supernumerary tooth. Fig 4. X-ray. Fig 5. The same tooth after electrosurgery and initial tooth preparation. Next Fig 6. Placement of the temporary crown. Note that acrylic was extended from the temporary on the lateral to the supernumerary to provide initial stability of the temporary until root canal therapy and a cast post and core was placed. Then Fig 7. X-ray of the final root canal therapy, cast post and core and dental crown. Finally Fig 8. The result.
Incidentally this patient refused to straighten his teeth with braces.
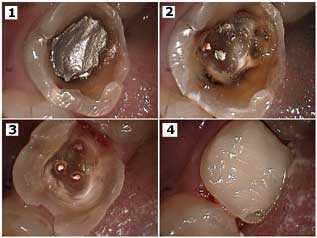
Treatment of severe tooth decay in a molar that had root canal therapy with only a large bonded filling restoration
This neglected lower molar that had an adequate root canal yet very decayed amalgam silver filling. Next the extent of the tooth decay is visible after removal of the silver filling. Then the tooth decay is removed. Note the gutta percha coming out of the three orifices. Finally the bonded restoration, a white tooth filling. The point here is that a bonded restoration can be placed even when a crown is obviously indicated. Finally the crown will be placed after the patient completes orthodontics, braces.
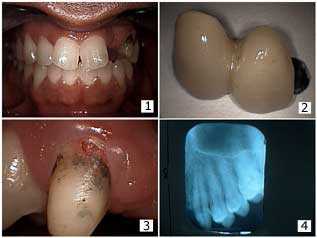
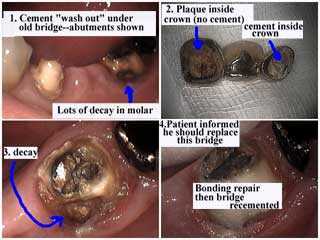
Teeth decay – dental caries – under a dental bridge that was repaired
Dental caries or a cavity under a dental bridge that was repaired
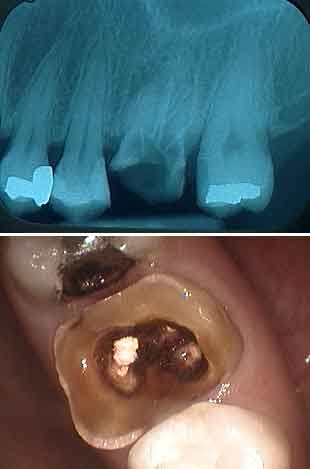
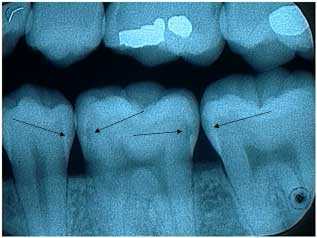
Diagnosis of radiographic decay – x-rays of tooth decay
Ordinarily teeth cavities can be difficult to identify on x-rays. In this case dark shadows can be seen in the outer (whiter) tooth enamel.

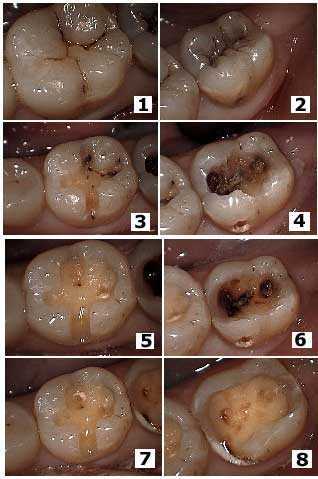
Tooth decay cavity identification, cavity removal and dental bonding fillings in two upper jaw molars
Photos #’s 1, 3, 5 and 8 show the first molar; Photos #’s 2, 4, 6, 7 and 8 show the second molar. Photos #’s 1 and 3 show the initial cavity. Photos #’s 3 – 7 show the steps in cavity removal. Lastly photo # 8 shows the final dental bonding white fillings.
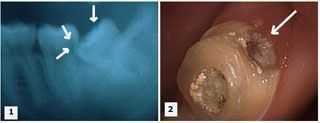
Tooth decay diagnosis interpretation and removal in two molars
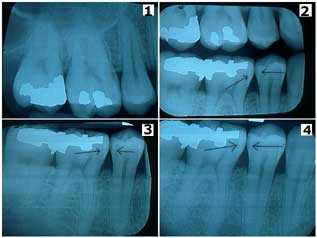
Dental caries diagnosis identification and removal in two lower molar teeth
1) The interproximal tooth decay was identified in x-rays; the teeth looked ok intraorally. 2) – 3) Then initial teeth cavity preparation into the proximal boxes. Notice that in the proximal boxes, the mesial of the second molar shows a zone of teeth decalcification (increased whiteness) and the distal of the first molar shows a black crack line. Both should be removed. Next in 4) note that tooth cavity removal shows the continued presence of teeth decalcification and decay on the lateral (buccal) edges of both proximal boxes. Lastly in 5) complete dental caries removal.
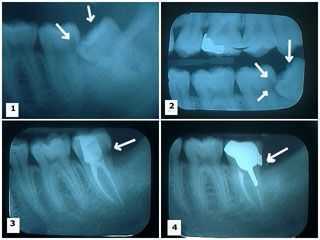
Tooth decay x-ray or dental caries radiograph
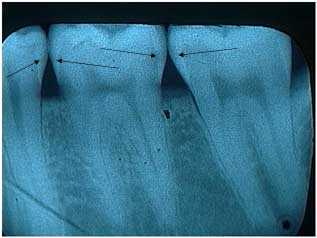
An x-ray showing tooth decay – it may not cause tooth pain
An x-ray showing tooth decay in multiple teeth where there was no tooth pain
In conclusion x-rays are necessary to properly diagnose dental health. However they should not be taken every six months or even every year for people who are at low risk for cavities or gum disease.
Tooth color can be an indication of tooth decay
A hopeless tooth that should be extracted because of tooth decay
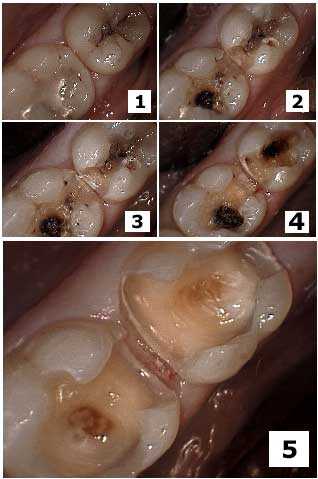
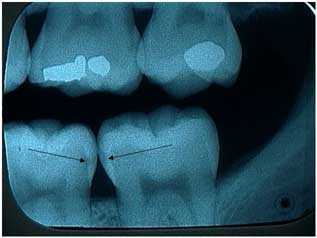
Wisdom teeth can cause tooth decay in the adjacent second molar
Wisdom teeth can cause tooth decay in the adjacent second molar
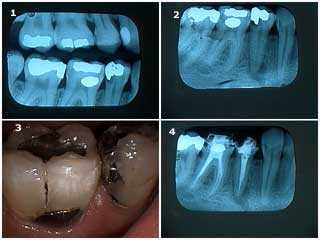
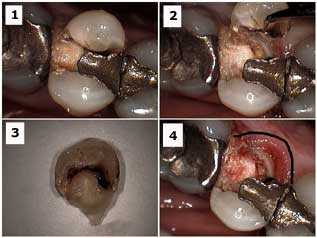
These photos show preparation of the second molar to remove the distal dental caries after root canal therapy was performed on it and the wisdom tooth was removed. 1) – 2) Tooth Decay is present in the distal area of the second molar. Temporary dental filling material is visible in the occlusal opening following root canal therapy. 3) Next dental Decay removed. Therefore in 4) temporary filling material removal shows gutta percha in root canal orifices prior to cast post and core preparation.
Tooth decay in the teeth adjacent to wisdom teeth
In conclusion Dr. Jeffrey Dorfman created all of the dentistry shown on this 4,400 page website. In brief we offer intelligent & honest diagnosis and better results for our patients who need help with tooth decay. Visit us when you want it done right the first time; you will save money by initially spending more. Therefore please call The Center for Special Dentistry®.